CI/CD Jobs
- Tier: Free, Premium, Ultimate
- Offering: GitLab.com, GitLab Self-Managed, GitLab Dedicated
CI/CD jobs are the fundamental elements of a GitLab CI/CD pipeline.
Jobs are configured in the .gitlab-ci.yml file with a list of commands to execute
to accomplish tasks like building, testing, or deploying code.
Jobs:
- Execute on a runner, for example in a Docker container.
- Run independently from other jobs.
- Have a job log with the full execution log for the job.
Jobs are defined with YAML keywords that define all aspects of the job’s execution, including keywords that:
- Control how and when jobs run.
- Group jobs together in collections called stages. Stages run in sequence, while all jobs in a stage can run in parallel.
- Define CI/CD variables for flexible configuration.
- Define caches to speed up job execution.
- Save files as artifacts which can be used by other jobs.
Add a job to a pipeline
To add a job to a pipeline, add it into your .gitlab-ci.yml file. The job must:
- Be defined at the top-level of the YAML configuration.
- Have a unique job name.
- Have either a
scriptsection defining commands to run, or atriggersection to trigger a downstream pipeline to run.
For example:
my-ruby-job:
  script:
    - bundle install
    - bundle exec my_ruby_command

my-shell-script-job:
  script:
    - my_shell_script.sh
Job names
You can’t use these keywords as job names:
imageservicesstagesbefore_scriptafter_scriptvariablescacheincludepages:deployconfigured for adeploystage
Additionally, these names are valid when quoted, but are not recommended as they can make pipeline configuration unclear:
"true":"false":"nil":
Job names must be 255 characters or fewer.
Use unique names for your jobs. If multiple jobs have the same name in a file, only one is added to the pipeline, and it’s difficult to predict which one is chosen. If the same job name is used in one or more included files, parameters are merged.
Hide a job
To temporarily disable a job without deleting it from the configuration
file, add a period (.) to the start of the job name. Hidden jobs do not need to contain
the script or trigger keywords, but must contain valid YAML configuration.
For example:
.hidden_job:
  script:
    - run test
Hidden jobs are not processed by GitLab CI/CD, but they can be used as templates for reusable configuration with:
Set default values for job keywords
You can use the default keyword to set default job keywords and values, which are
used by default by all jobs in a pipeline.
For example:
default:
  image: 'ruby:2.4'
  before_script:
    - echo Hello World

rspec-job:
  script: bundle exec rspec
When the pipeline runs, the job uses the default keywords:
rspec-job:
  image: 'ruby:2.4'
  before_script:
    - echo Hello World
  script: bundle exec rspec
Control the inheritance of default keywords and variables
You can control the inheritance of:
For example:
default:
  image: 'ruby:2.4'
  before_script:
    - echo Hello World

variables:
  DOMAIN: example.com
  WEBHOOK_URL: https://my-webhook.example.com

rubocop:
  inherit:
    default: false
    variables: false
  script: bundle exec rubocop

rspec:
  inherit:
    default: [image]
    variables: [WEBHOOK_URL]
  script: bundle exec rspec

capybara:
  inherit:
    variables: false
  script: bundle exec capybara

karma:
  inherit:
    default: true
    variables: [DOMAIN]
  script: karma
In this example:
rubocop:- inherits: Nothing.
rspec:- inherits: the default
imageand theWEBHOOK_URLvariable. - does not inherit: the default
before_scriptand theDOMAINvariable.
- inherits: the default
capybara:- inherits: the default
before_scriptandimage. - does not inherit: the
DOMAINandWEBHOOK_URLvariables.
- inherits: the default
karma:- inherits: the default
imageandbefore_script, and theDOMAINvariable. - does not inherit:
WEBHOOK_URLvariable.
- inherits: the default
View jobs in a pipeline
When you access a pipeline, you can see the related jobs for that pipeline.
The order of jobs in a pipeline depends on the type of pipeline graph.
- For full pipeline graphs, jobs are sorted alphabetically by name.
- For pipeline mini graphs, jobs are sorted by status severity with failed jobs appearing first, and then alphabetically by name.
Selecting an individual job shows you its job log, and allows you to:
- Cancel the job.
- Retry the job, if it failed.
- Run the job again, if it passed.
- Erase the job log.
View project jobs
- Offering: GitLab.com, GitLab Self-Managed
To view jobs that ran in a project:
- In the top bar, select Search or go to and find your project.
- In the left sidebar, select Build > Jobs.
You can filter the list by job status, source, name, and kind.
The filter by name returns jobs created in the last 30 days. This retention period applies to both UI and API filtering.
By default, the filter shows only build jobs. To view trigger jobs, clear the filter, then select Kind > Trigger.
The Kind filter is available only for project jobs. It is not available in the Admin area.
Available job statuses
CI/CD jobs can have the following statuses:
canceled: Job was manually canceled or automatically aborted.canceling: Job is being canceled butafter_scriptis running.created: Job has been created but not yet processed.failed: Job execution failed.manual: Job requires manual action to start.pending: Job is in the queue waiting for a runner.preparing: Runner is preparing the execution environment.running: Job is executing on a runner.scheduled: Job has been scheduled but execution hasn’t started.skipped: Job was skipped due to conditions or dependencies.success: Job completed successfully.waiting_for_callback: Job is waiting for a callback from an external service.waiting_for_resource: Job is waiting for resources to become available.
View the source of a job
GitLab CI/CD jobs include a source attribute that indicates the action that triggered the job. Use this attribute to track how a job was initiated or filter job runs based on the specific sources.
Available job sources
The source attribute can have the following values:
api: Job initiated by a REST call to the Jobs API.chat: Job initiated by a chat command using GitLab ChatOps.container_registry_push: Job initiated by container registry push.duo_workflow: Job initiated by GitLab Duo Agent Platform.external: Job initiated by an event in an external repository integrated with GitLab. This does not include pull request events.external_pull_request_event: Job initiated by a pull request event in an external repository.merge_request_event: Job initiated by a merge request event.ondemand_dast_scan: Job initiated by an on-demand DAST scan.ondemand_dast_validation: Job initiated by an on-demand DAST validation.parent_pipeline: Job initiated by a parent pipelinepipeline: Job initiated by a user manually running a pipeline.pipeline_execution_policy: Job initiated by a pipeline execution policy.pipeline_execution_policy_schedule: Job initiated by a scheduled pipeline execution policy.push: Job initiated by a code push.scan_execution_policy: Job initiated by a scan execution policy.schedule: Job initiated by a scheduled pipeline.security_orchestration_policy: Job initiated by a scheduled scan execution policy.trigger: Job initiated by another job or pipeline.unknown: Job initiated by an unknown source.web: Job initiated by a user from the GitLab UI.webide: Job initiated by a user from the Web IDE.
Group similar jobs together in pipeline views
If you have many similar jobs, your pipeline graph becomes long and hard to read.
You can automatically group similar jobs together. If the job names are formatted in a certain way, they are collapsed into a single group in regular pipeline graphs (not the mini graphs).
You can recognize when a pipeline has grouped jobs if you see a number next to a job name instead of the retry or cancel buttons. The number indicates the amount of grouped jobs. Hovering over them shows you if all jobs have passed or any has failed. Select to expand them.
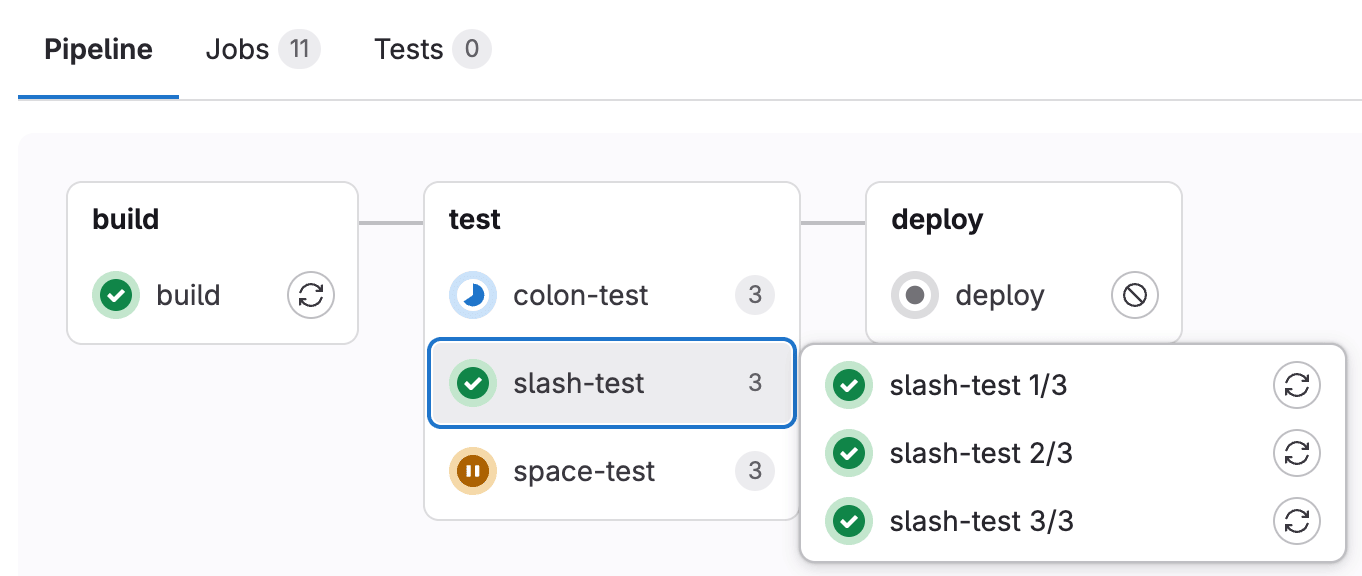
To create a group of jobs, in the .gitlab-ci.yml file,
separate each job name with a number and one of the following:
- A forward or backward slash (
/or\), for example,slash-test 1/3,slash-test 2/3,slash-test 3/3. - A colon (
:), for example,colon-test 1:3,colon-test 2:3,colon-test 3:3. - A space, for example
space-test 0 3,space-test 1 3,space-test 2 3.
You can use these symbols interchangeably.
In the following example, these three jobs are in a group named build ruby:
build ruby 1/3:
  stage: build
  script:
    - echo "ruby1"

build ruby 2/3:
  stage: build
  script:
    - echo "ruby2"

build ruby 3/3:
  stage: build
  script:
    - echo "ruby3"
The pipeline graph displays a group named build ruby with three jobs.
The jobs are ordered by comparing the numbers from left to right. You usually want the first number to be the index and the second number to be the total.
Retry jobs
You can retry a job after it completes, regardless of its final state (failed, success, or canceled).
When you retry a job:
- A new job instance is created with a new job ID.
- The job runs with the same parameters and variables as the original job.
- If the job produces artifacts, new artifacts are created and stored.
- The new job associates with the user who initiated the retry, not the user who created the original pipeline.
- Any subsequent jobs that were previously skipped are reassigned to the user who initiated the retry.
When you retry a trigger job that triggers a downstream pipeline:
- The trigger job generates a new downstream pipeline.
- The downstream pipeline also associates with the user who initiated the retry.
- The downstream pipeline runs with the configuration that exists at the time of the retry, which might be different from the original run.
Retry a job
Prerequisites:
- You must have the Developer, Maintainer, or Owner role for the project.
- The job must not be archived.
To retry a job from a merge request:
- In the top bar, select Search or go to and find your project.
- From your merge request, do one of the following:
- In the pipeline widget, next to the job you want to retry, select Run again ( ).
- Select the Pipelines tab, next to the job you want to retry, select Run again ( ).
To retry a job from the job log:
- Go to the job’s log page.
- In the upper-right corner, select Run again ( ).
To retry a job from a pipeline:
- In the top bar, select Search or go to and find your project.
- In the left sidebar, select Build > Pipelines.
- Find the pipeline that contains the job you want to retry.
- From the pipeline graph, next to the job you want to retry, select Run again ( ).
Retry all failed or canceled jobs in a pipeline
If a pipeline has multiple failed or canceled jobs, you can retry all of them at once:
- In the top bar, select Search or go to and find your project.
- Do one of the following:
- Select Build > Pipelines.
- Go to a merge request and select the Pipelines tab.
- For the pipeline with failed or canceled jobs, select Retry all failed or canceled jobs ( ).
Cancel jobs
You can cancel a CI/CD job that hasn’t completed yet.
When you cancel a job, what happens next depends on its state and the GitLab Runner version:
- For jobs that haven’t started executing yet, the job is canceled immediately.
- For running jobs:
- For GitLab Runner 16.10 and later with GitLab 17.0 and later:
- The job is marked as
canceling. - The currently-running command is allowed to complete. The rest of the commands in the job’s
before_scriptorscriptare skipped. - If the job has an
after_scriptsection, it always starts and runs to completion. - The job is marked as
canceled.
- The job is marked as
- For GitLab Runner 16.9 and earlier with GitLab 16.11 and earlier, the job is
canceledimmediately without runningafter_script.
- For GitLab Runner 16.10 and later with GitLab 17.0 and later:
If you need to cancel a job immediately without waiting for the after_script, use force cancel.
Cancel a job
Prerequisites:
- You must have the Developer, Maintainer, or Owner role for the project, or the minimum role required to cancel a pipeline or job.
To cancel a job from a merge request:
- In the top bar, select Search or go to and find your project.
- From your merge request, do one of the following:
- In the pipeline widget, next to the job you want to cancel, select Cancel ( ).
- Select the Pipelines tab, next to the job you want to cancel, select Cancel ( ).
To cancel a job from the job log:
- Go to the job’s log page.
- In the upper-right corner, select Cancel ( ).
To cancel a job from a pipeline:
- In the top bar, select Search or go to and find your project.
- In the left sidebar, select Build > Pipelines.
- Find the pipeline that contains the job you want to cancel.
- From the pipeline graph, next to the job you want to cancel, select Cancel ( ).
Cancel all running jobs in a pipeline
You can cancel all jobs in a running pipeline at once.
- In the top bar, select Search or go to and find your project.
- Do one of the following:
- Select Build > Pipelines.
- Go to a merge request and select the Pipelines tab.
- For the pipeline you want to cancel, select Cancel the running pipeline ( ).
Force cancel a job
If you don’t want to wait for after_script to finish or a job is unresponsive, you can force cancel it.
Force cancel immediately moves a job from the canceling state to canceled.
When you force cancel a job, the job token is immediately revoked.
If the runner is still executing the job, it loses access to GitLab.
The runner aborts the job without waiting for after_script to complete.
Prerequisites:
- You must have the Maintainer or Owner role for the project.
- The job must be in the
cancelingstate, which requires:- GitLab 17.0 and later.
- GitLab Runner 16.10 and later.
To force cancel a job:
- Go to the job’s log page.
- In the upper-right corner, select Force cancel.
Troubleshoot a failed job
When a pipeline fails or is allowed to fail, there are several places where you can find the reason:
- In the pipeline graph, in the pipeline details view.
- In the pipeline widgets, in the merge requests and commit pages.
- In the job views, in the global and detailed views of a job.
In each place, if you hover over the failed job you can see the reason it failed.
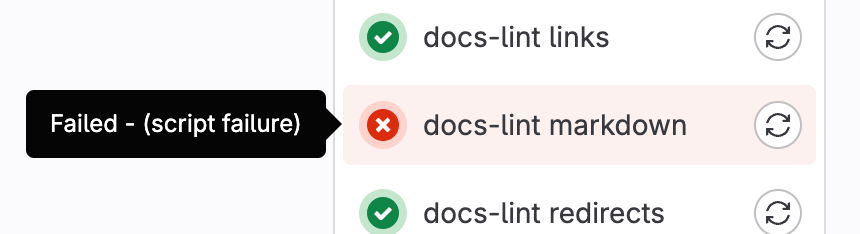
You can also see the reason it failed on the Job detail page.
With Root Cause Analysis
You can use GitLab Duo Root Cause Analysis in GitLab Duo Chat to troubleshoot failed CI/CD jobs.
Deployment jobs
Deployment jobs are CI/CD jobs that use environments.
A deployment job is any job that uses the environment keyword and the start environment action.
Deployment jobs do not need to be in the deploy stage. The following deploy me
job is an example of a deployment job. action: start is the default behavior and
is defined here for clarity, but you can omit it:
deploy me:
  script:
    - deploy-to-cats.sh
  environment:
    name: production
    url: https://cats.example.com
    action: start
The behavior of deployment jobs can be controlled with deployment safety settings like preventing outdated deployment jobs and ensuring only one deployment job runs at a time.