Webhooks
- Tier: Free, Premium, Ultimate
- Offering: GitLab.com, GitLab Self-Managed, GitLab Dedicated
Webhooks connect GitLab to your other tools and systems through real-time notifications. When important events happen in GitLab, webhooks send that information directly to your external applications. Build automation workflows by reacting to merge requests, code pushes, and issue updates.
With webhooks, your team stays synchronized as changes occur:
- External issue trackers update automatically when GitLab issues change.
- Chat applications notify team members about pipeline completions.
- Custom scripts deploy applications when code reaches the main branch.
- Monitoring systems track development activity across your entire organization.
Webhook events
Various events in GitLab can trigger webhooks. For example:
- Pushing code to a repository.
- Posting a comment on an issue.
- Creating a merge request.
Webhook limits
GitLab.com enforces webhook limits, including:
- Maximum number of webhooks per project or group.
- Number of webhook calls per minute.
- Webhook timeout duration.
For GitLab Self-Managed, administrators can modify these limits.
Push event limits
GitLab limits webhook triggers for push events that include multiple changes:
- Default limit: 3 branches or tags per push.
- Behavior when exceeded: No webhooks are triggered for the entire push event.
- Applies to: Both project webhooks and system hooks.
- Configuration: GitLab Self-Managed administrators can modify the
push_event_hooks_limitsetting through the application settings API.
If you frequently push multiple tags or branches simultaneously and need webhook notifications, contact your GitLab administrator to increase this limit.
Group webhooks
- Tier: Premium, Ultimate
Group webhooks are custom HTTP callbacks that send notifications for events across all projects in a group and its subgroups.
Types of group webhook events
You can configure group webhooks to listen for:
- All events that occur in projects in the group and subgroups
- Group-specific events, including group member events, project events, and subgroup events
Webhooks in both a project and a group
If you configure identical webhooks in both a group and a project in that group, both webhooks are triggered for events in that project. This allows for flexible event handling at different levels of your GitLab organization.
Configure webhooks
Create and configure webhooks in GitLab to integrate with your project’s workflow. Use these features to set up webhooks that meet your specific requirements.
Create a webhook
For new webhooks, use a signing token instead of a secret token. The signing token computes an HMAC-SHA256 signature over the payload, so your endpoint can verify both the authenticity and integrity of the request. The secret token only provides a plain-text value in a header, which offers weaker guarantees. The secret token is not recommended for new webhooks.
Create a webhook to send notifications about events in your project or group.
Prerequisites:
- For project webhooks, you must have the Maintainer or Owner role for the project.
- For group webhooks, you must have the Owner role for the group.
To create a webhook:
- In the top bar, select Search or go to and find your project or group.
- In the left sidebar, select Settings > Webhooks.
- Select Add new webhook.
- In URL, enter the URL of the webhook endpoint. Use percent-encoding for special characters.
- Optional. Enter a Name and Description for the webhook.
- Optional. Configure request authentication. Use a signing token for stronger security:
- Signing token (recommended): Select Generate signing token. Copy and save the token now because it is displayed only once. Your webhook endpoint can use this token to verify the HMAC-SHA256 signature.
- Secret token (not recommended): Enter a token in the Secret token field.
This token is sent as plain text in the
X-Gitlab-TokenHTTP header and provides weaker security guarantees than a signing token. Use the signing token instead for new webhooks.
- In the Trigger section, select the events to trigger the webhook.
- Optional. To disable SSL verification, clear the Enable SSL verification checkbox.
- Select Add webhook.
Signing tokens
Use a signing token to verify that webhook payloads originate from GitLab and have not been tampered with. Unlike the secret token, the signing token is used to compute an HMAC-SHA256 signature over the payload. This means recipients can independently verify both the authenticity and integrity of the received payload.
GitLab webhook delivery follows the Standard Webhooks
specification. Every webhook request includes the webhook-id and webhook-timestamp headers.
When a signing token is configured, GitLab also includes the webhook-signature header with the
HMAC-SHA256 signature. Each signature has the format v1,{base64_signature}. The header may
contain multiple space-separated signatures. GitLab currently sends one signature, but this
may change in the future. The signature is computed over the string
{message_id}.{timestamp}.{body}, where:
{message_id}is the value of thewebhook-idheader.{timestamp}is the value of thewebhook-timestampheader.{body}is the raw JSON request body.
Verify the signature
To verify the signature in your webhook endpoint:
- Retrieve the
webhook-id,webhook-timestamp, andwebhook-signatureheader values. - Split the
webhook-signaturevalue on spaces to get the list of signatures. - Construct the message string:
"{message_id}.{timestamp}.{body}". - Decode the signing token: strip the
whsec_prefix, then base64-decode the remainder. - Compute the HMAC-SHA256 digest using the decoded key.
- Encode the digest as base64 and prefix with
v1,. - Check whether the computed signature matches any entry in the signature list. Use a constant-time comparison to prevent timing attacks.
Example in Ruby:
require 'base64'
require 'openssl'

def valid_signature?(signing_token, message_id, timestamp, body, received_signatures)
  raw_key = Base64.strict_decode64(signing_token.delete_prefix('whsec_'))
  message = "#{message_id}.#{timestamp}.#{body}"
  digest = OpenSSL::HMAC.digest('sha256', raw_key, message)
  expected = "v1,#{Base64.strict_encode64(digest)}"
  received_signatures.split(' ').any? do |sig|
    ActiveSupport::SecurityUtils.secure_compare(expected, sig)
  end
end
Example in Python:
import base64
import hashlib
import hmac

def valid_signature(signing_token, message_id, timestamp, body, received_signatures):
    raw_key = base64.b64decode(signing_token.removeprefix('whsec_'))
    message = f"{message_id}.{timestamp}.{body}".encode('utf-8')
    digest = hmac.new(raw_key, message, hashlib.sha256).digest()
    expected = "v1," + base64.b64encode(digest).decode('utf-8')
    return any(
        hmac.compare_digest(expected, sig)
        for sig in received_signatures.split(' ')
    )
Backward compatibility
The signing token works alongside the existing secret token. You can configure both on the same webhook:
- The
X-Gitlab-Tokenheader is still sent if a secret token is configured. - The
webhook-signatureandwebhook-idheaders are sent if a signing token is configured.
To migrate an existing webhook using the secret token to a signing token without downtime, configure both tokens on the same
webhook during the transition. Update your receiver to verify the signature when webhook-signature is
present and fall back to the secret token otherwise.
Once your receiver handles signatures correctly, you can remove the secret token from the webhook settings.
Security considerations
To prevent replay attacks, validate that the timestamp in webhook-timestamp is recent before processing the payload.
The signing token is never returned by the API.
Mask sensitive portions of webhook URLs
Mask sensitive portions of webhook URLs to enhance security. Masked portions are replaced with configured values when webhooks are executed, are not logged, and are encrypted at rest in the database.
To mask sensitive portions of a webhook URL:
- In the top bar, select Search or go to and find your project or group.
- In the left sidebar, select Settings > Webhooks.
- In URL, enter the full URL of the webhook.
- To define masked portions, select Add URL masking.
- In Sensitive portion of URL, enter the part of the URL you want to mask.
- In How it looks in the UI, enter the value to display instead of the masked portion.
Variable names must contain only lowercase letters (
a-z), numbers (0-9), or underscores (_). - Select Save changes.
The masked values appear hidden in the UI.
For example, if you’ve defined variables path and value, the webhook URL can look like this:
https://webhook.example.com/{path}?key={value}Custom headers
Add custom headers to webhook requests for authentication to external services. You can configure up to 20 custom headers per webhook.
Custom headers must:
- Not override the values of delivery headers.
- Contain only alphanumeric characters, periods, dashes, or underscores.
- Start with a letter and end with a letter or number.
- Have no consecutive periods, dashes, or underscores.
Custom headers show in Recent events with masked values.
Custom webhook template
Create a custom payload template for your webhook to control the data sent in the request body.
Create a custom webhook template
- For project webhooks, you must have the Maintainer or Owner role for the project.
- For group webhooks, you must have the Owner role for the group.
To create a custom webhook template:
- Go to your webhook configuration.
- Set a custom webhook template.
- Ensure the template renders as valid JSON.
Use fields from the payload of an event in your template. For example:
{{build_name}}for a job event{{deployable_url}}for a deployment event
To access nested properties, use periods to separate path segments.
Example custom webhook template
For this custom payload template:
{
  "event": "{{object_kind}}",
  "project_name": "{{project.name}}"
}
The resulting request payload for a push event is:
{
  "event": "push",
  "project_name": "Example"
}
Custom webhook templates cannot access properties in arrays.
Filter push events by branch
Filter push events sent to your webhook endpoint by the branch name.
Use one of these filtering options:
- All branches: Receive push events from all branches.
- Wildcard pattern: Receive push events from branches that match a wildcard pattern.
- Regular expression: Receive push events from branches that match a regular expression (regex).
Use a wildcard pattern
To filter by using a wildcard pattern:
- In the webhook configuration, select Wildcard pattern.
- Enter a pattern.
For example:
*-stableto match branches ending with-stable.production/*to match branches in theproduction/namespace.
Use a regular expression
To filter by using a regular expression:
- In the webhook configuration, select Regular expression.
- Enter a regex pattern that follows the RE2 syntax.
For example, to exclude the main branch, use:
\b(?:m(?!ain\b)|ma(?!in\b)|mai(?!n\b)|[a-l]|[n-z])\w*|\b\w{1,3}\b|\W+Configure webhooks to support mutual TLS
- Offering: GitLab Self-Managed
Configure webhooks to support mutual TLS by setting a global client certificate in PEM format.
Prerequisites:
- You must be a GitLab administrator.
To configure mutual TLS for webhooks:
- Prepare a client certificate in PEM format.
- Optional. Protect the certificate with a PEM passphrase.
- Configure GitLab to use the certificate.
Edit
/etc/gitlab/gitlab.rb:gitlab_rails['http_client']['tls_client_cert_file'] = '<PATH TO CLIENT PEM FILE>' gitlab_rails['http_client']['tls_client_cert_password'] = '<OPTIONAL PASSWORD>'Save the file and reconfigure GitLab:
sudo gitlab-ctl reconfigure
Edit
docker-compose.yml:version: "3.6" services: gitlab: image: 'gitlab/gitlab-ee:latest' restart: always hostname: 'gitlab.example.com' environment: GITLAB_OMNIBUS_CONFIG: | gitlab_rails['http_client']['tls_client_cert_file'] = '<PATH TO CLIENT PEM FILE>' gitlab_rails['http_client']['tls_client_cert_password'] = '<OPTIONAL PASSWORD>'Save the file and restart GitLab:
docker compose up -d
Edit
/home/git/gitlab/config/gitlab.yml:production: &base http_client: tls_client_cert_file: '<PATH TO CLIENT PEM FILE>' tls_client_cert_password: '<OPTIONAL PASSWORD>'Save the file and restart GitLab:
# For systems running systemd
sudo systemctl restart gitlab.target

# For systems running SysV init
sudo service gitlab restart
After configuration, GitLab presents this certificate to the server during TLS handshakes for webhook connections.
Configure firewalls for webhook traffic
Configure firewalls for webhook traffic based on how GitLab sends webhooks:
- Asynchronously from Sidekiq nodes (most common)
- Synchronously from Rails nodes (in specific cases)
Webhooks are sent synchronously from Rails nodes when you test or retry a webhook in the UI.
When configuring firewalls, ensure both Sidekiq and Rails nodes can send webhook traffic.
Manage webhooks
Monitor and maintain your configured webhooks in GitLab.
View webhook request history
View the history of webhook requests to monitor their performance and troubleshoot issues.
Prerequisites:
- For project webhooks, you must have the Maintainer or Owner role for the project.
- For group webhooks, you must have the Owner role for the group.
To view the request history for a webhook:
- In the top bar, select Search or go to and find your project or group.
- In the left sidebar, select Settings > Webhooks.
- Select Edit for the webhook.
- Go to the Recent events section.
The Recent events section displays all requests made to a webhook in the last two days. The table includes:
- HTTP status code:
- Green for
200-299codes - Red for other codes
internal errorfor failed deliveries
- Green for
- Triggered event
- Elapsed time of the request
- Relative time the request was made

Inspect request and response details
Prerequisites:
- For project webhooks, you must have the Maintainer or Owner role for the project.
- For group webhooks, you must have the Owner role for the group.
Each webhook request in Recent events has a Request details page. This page contains the body and headers of:
- The response GitLab received from the webhook receiver endpoint
- The webhook request GitLab sent
To inspect the request and response details of a webhook event:
- In the top bar, select Search or go to and find your project or group.
- In the left sidebar, select Settings > Webhooks.
- Select Edit for the webhook.
- Go to the Recent events section.
- Select View details for the event.
To send the request again with the same data and the same Idempotency-Key header, select Resend Request.
If the webhook URL has changed, you cannot resend the request.
You can also resend the request programmatically through the project webhooks API.
Test a webhook
Test a webhook to ensure it’s working properly or to re-enable a disabled webhook.
Prerequisites:
- For project webhooks, you must have the Maintainer or Owner role for the project.
- For group webhooks, you must have the Owner role for the group.
- To test
push events, your project must have at least one commit.
To test a webhook:
- In the top bar, select Search or go to and find your project or group.
- In the left sidebar, select Settings > Webhooks to see all webhooks for this project.
- To test a webhook directly from the list of configured webhooks:
- Locate the webhook you want to test.
- From the Test dropdown list, select the type of event to test.
- To test a webhook while editing it:
- Locate the webhook you want to test, and select Edit.
- Make your changes to the webhook.
- Select the Test dropdown list, then select the type of event to test.
Testing is not supported for some types of events for project and group webhooks. For more information, see issue 379201.
Webhook reference
Use this technical reference to:
- Understand how GitLab webhooks work.
- Integrate webhooks with your systems.
- Set up, troubleshoot, and optimize your webhook configurations.
Webhook receiver requirements
Implement fast and stable webhook receiver endpoints to ensure reliable webhook delivery.
Slow, unstable, or incorrectly configured receivers might be disabled automatically. Invalid HTTP responses are treated as failed requests.
To optimize your webhook receivers:
- Respond quickly with a
200or201status:- Avoid processing webhooks in the same request.
- Use a queue to handle webhooks after receiving them.
- Respond before the timeout limit to prevent automatic disabling on GitLab.com.
- Handle potential duplicate events:
- Prepare for duplicate events if a webhook times out.
- Ensure your endpoint is consistently fast and stable.
- Minimize response headers and body:
- GitLab stores response headers and body for later inspection.
- Limit the number and size of returned headers.
- Consider responding with an empty body.
- Use appropriate status codes:
- Return client error status responses (
4xxrange) only for misconfigured webhooks. - For unsupported events, return
400or ignore the payload. - Avoid
500server error responses for handled events.
- Return client error status responses (
Auto-disabled webhooks
The availability of this feature is controlled by a feature flag. For more information, see the history.
GitLab automatically disables project or group webhooks that fail four consecutive times.
To view auto-disabled webhooks:
- In the top bar, select Search or go to and find your project or group.
- In the left sidebar, select Settings > Webhooks.
In the webhook list, auto-disabled webhooks display as:
- Temporarily disabled if they fail four consecutive times
- Disabled if they fail 40 consecutive times
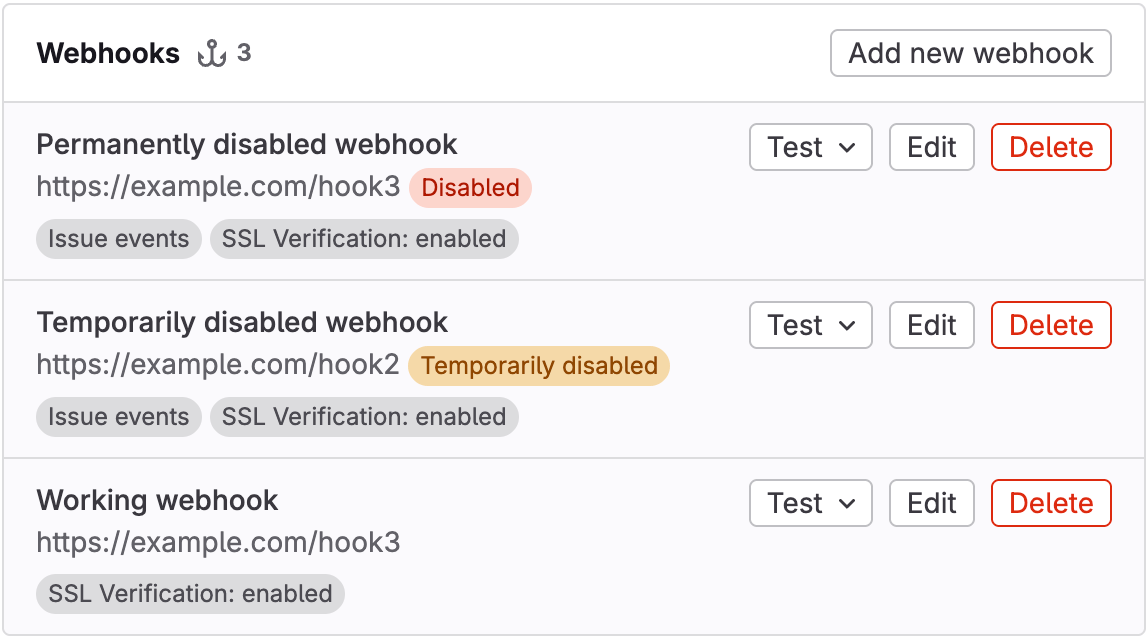
Temporarily disabled webhooks
Webhooks are temporarily disabled if they fail four consecutive times. If webhooks fail 40 consecutive times, they become permanently disabled.
Failure occurs when:
- The webhook receiver returns a response code in the
4xxor5xxrange. - The webhook experiences a timeout when attempting to connect to the webhook receiver.
- The webhook encounters other HTTP errors.
Temporarily disabled webhooks are initially disabled for one minute, with the duration extending on subsequent failures up to 24 hours. After this period has elapsed, these webhooks are automatically re-enabled.
Permanently disabled webhooks
Webhooks are permanently disabled if they fail 40 consecutive times. Unlike temporarily disabled webhooks, these webhooks are not automatically re-enabled.
Webhooks that were permanently disabled in GitLab 17.10 and earlier underwent a data migration. These webhooks might display four failures in Recent events even though the UI might state they have 40 failures.
Re-enable disabled webhooks
To re-enable a disabled webhook, send a test request.
The webhook is re-enabled if the test request returns a response code in the 2xx range.
Delivery headers
GitLab includes the following headers in webhook requests to your endpoint.
| Header | Description | Example |
|---|---|---|
Idempotency-Key | Unique ID consistent across webhook retries. Available for legacy reasons; prefer webhook-id. | "f5e5f430-f57b-4e6e-9fac-d9128cd7232f" |
User-Agent | User agent in the format "Gitlab/<VERSION>". | "GitLab/15.5.0-pre" |
webhook-id | Unique message ID consistent across webhook retries. Equal to Idempotency-Key. | "f5e5f430-f57b-4e6e-9fac-d9128cd7232f" |
webhook-signature | Space-separated list of HMAC-SHA256 signatures, each in the format v1,{base64_signature}. Included only when a signing token is configured. | "v1,abc123def456==" |
webhook-timestamp | Unix timestamp (seconds since epoch) when the request was generated. | "1744578123" |
X-Gitlab-Event-UUID | Unique ID for non-recursive webhooks. Recursive webhooks (triggered by earlier webhooks) share the same value. | "13792a34-cac6-4fda-95a8-c58e00a3954e" |
X-Gitlab-Event | Webhook type name. Corresponds to event types in the format "<EVENT> Hook". | "Push Hook" |
X-Gitlab-Instance | Hostname of the GitLab instance that sent the webhook. | "https://gitlab.com" |
X-Gitlab-Token | Secret token for the webhook, sent as plain text. Included only when a secret token is configured. | "my-secret-token" |
X-Gitlab-Webhook-UUID | Unique ID for each webhook. | "02affd2d-2cba-4033-917d-ec22d5dc4b38" |
Image URL display in webhook body
GitLab rewrites relative image references to absolute URLs in webhook bodies.
Image URL rewriting example
If the original image reference in a merge request, comment, or wiki page is:
The rewritten image reference in the webhook body would be:
This example assumes:
- GitLab is installed at
gitlab.example.com. - The project ID is at
123.
Exceptions to image URL rewriting
GitLab does not rewrite image URLs when:
- They already use HTTP, HTTPS, or protocol-relative URLs.
- They use advanced Markdown features, such as link labels.