Vulnerability report
- Tier: Ultimate
- Offering: GitLab.com, GitLab Self-Managed, GitLab Dedicated
The vulnerability report provides a consolidated view of security vulnerabilities found in your codebase. Sort vulnerabilities by severity, report type, scanner (for projects only), and other attributes to determine which issues need attention first. Track vulnerabilities through their lifecycle with status indicators and activity icons that show remediation progress.
Access detailed information for each vulnerability, including Common Vulnerability Scoring System (CVSS) scores and file locations when available. Filter and group similar vulnerabilities to address them systematically.
For performance reasons, if the total number of vulnerabilities exceeds 1000, the vulnerability report displays the count as 1000+ instead of the exact number. This limitation affects only the counts displayed at the top of the page. You can still find all of the vulnerabilities in the table.
An improvement to show the exact count is proposed in issue 547510. To find the exact count, use one of the workarounds in issue 480378.
On GitLab.com, vulnerabilities are archived one year after they were last updated.
For an overview, see Vulnerability Management - Advanced Security Testing.
Contents of the vulnerability report
The report contains data from the default branch, showing cumulative results from all successful security scan jobs. Scan results appear after job completion or when a pipeline is blocked by manual jobs.
For projects and groups, the vulnerability report contains:
- Totals of vulnerabilities per severity level.
- Filters for common vulnerability attributes.
- Details of each vulnerability, presented in a table.
For some vulnerabilities, the details include a link to the relevant file and line number in the default branch. For CVE vulnerabilities, you can also view the KEV status, CVSS and EPSS scores, and reachability information in the vulnerability report.
For projects, the vulnerability report also contains:
- A time stamp shows when the default branch was last updated, including a link to the latest pipeline. Pipelines that run against non-default branches do not update the time stamp.
- The number of failures that occurred in the most recent pipeline. Select the failure notification to view the Failed jobs tab of the pipeline’s page.
The Activity column contains icons to indicate the activity, if any, taken on the vulnerability in that row:
- Issues : Links to issues created for the vulnerability.
- Merge requests : Links to merge requests created for the vulnerability.
- Checked circle : The vulnerability has been remediated.
- False positive : The scanner determined this vulnerability to be a false positive.
- Solution : Indicates that the vulnerability has a solution available.
- Vulnerability Resolution : Indicates that the vulnerability has an available AI resolution.
- False Positive Detection : Indicates that GitLab Duo has analyzed this vulnerability for false positives. Hover over the icon to see the confidence score and explanation.
To open an issue created for a vulnerability, hover over the Activity entry, then select the link. The issue icon ( ) indicates the issue’s status. If Jira issue support is enabled, the issue link found in the Activity entry links out to the issue in Jira. Unlike GitLab issues, the status of a Jira issue is not shown in the GitLab UI.

When vulnerabilities originate from a multi-project pipeline setup, this page displays the vulnerabilities that originate from the selected project.
View the vulnerability report
View the vulnerability report to list all vulnerabilities in the project or group.
Prerequisites:
- You must have the Security Manager, Developer, Maintainer, or Owner role for the project or group.
To view the vulnerability report:
- In the top bar, select Search or go to and find your project or group.
- In the left sidebar, select Secure > Vulnerability report.
Filtering vulnerabilities
You can filter vulnerabilities in the vulnerability report to more efficiently triage them.
You can filter by:
- Status: The current status of the vulnerability: needs triage, confirmed, dismissed, or resolved. Dismissed vulnerabilities can be filtered together or individually by the reason they were dismissed.
- Severity: The severity value of the vulnerability: critical, high, medium, low, info, unknown.
- Report type: The type of report that detected the vulnerability, such as SAST or Container fuzzing.
- Scanner: The specific scanner that identified the vulnerability.
- Activity: Additional properties of the vulnerability, such as whether or not the vulnerability has an issue, merge request, or solution available.
- Identifier: The vulnerability’s identifier (requires advanced vulnerability management. Without advanced vulnerability management, availability is restricted to projects and groups with a maximum of 20,000 vulnerabilities).
- Project: Filter vulnerabilities in specific projects (available only for groups).
- Reachability: Filter vulnerabilities by their reachability status: yes, not found, or not available. To use this filter, you must have advanced vulnerability management enabled.
- Validity check: Filter vulnerabilities by their validity status: active, inactive, or possibly active. To use this filter, you must have advanced vulnerability management enabled.
- Policy violation: Filter vulnerabilities by the bypass reason. Shows vulnerabilities that were introduced when a user bypassed a security policy violation from a security policy in warn mode. Users must provide a reason when they bypass any violation from a policy in warn mode. To use this filter, you must have advanced vulnerability management enabled.
Filter vulnerabilities
Filter the vulnerability report to focus on a subset of vulnerabilities.
To filter the list of vulnerabilities:
- In the top bar, select Search or go to and find your project.
- In the left sidebar, select Secure > Vulnerability report.
- Optional. To remove the default filters, select Clear ( ).
- Above the list of vulnerabilities, select the filter bar.
- In the dropdown list that appears, select an attribute you want to filter by, then select the values from the dropdown list.
- Select outside the filter field. The vulnerability severity totals and list of matching vulnerabilities are updated.
- To filter by multiple attributes, repeat the three previous steps. Multiple attributes are joined by a logical AND.
Report type filter
You can filter vulnerabilities based on the type of report that detected them. By default, the vulnerability report lists vulnerabilities from all report types.
Use the Manually added attribute to filter vulnerabilities that were added manually.
Scanner filter
For projects, you can filter vulnerabilities based on the scanner that detected them. By default, the vulnerability report lists vulnerabilities from all scanners.
Project filter
The content of the Project filter varies:
- Security Center: Only projects you’ve added to your personal Security Center.
- Group: All projects in the group.
- Project: Not applicable.
Activity filter
The activity filter behaves differently from the other filters. You can select only one value in each category. To remove a filter, from the activity filter dropdown list select the filter you want to remove.
Selection behavior when using the activity filter:
- Activity
- All activity: Vulnerabilities with any activity status (same as ignoring this filter). Selecting this deselects all other activity filter options.
- Detection
- Still detected (default): Vulnerabilities that are still detected in the latest pipeline scan of the
defaultbranch. - No longer detected: Vulnerabilities that are no longer detected in the latest pipeline scan of the
defaultbranch.
- Still detected (default): Vulnerabilities that are still detected in the latest pipeline scan of the
- Issue
- Has issues: Vulnerabilities with one or more associated issues.
- Does not have issue: Vulnerabilities without an associated issue.
- Merge request
- Has merge request: Vulnerabilities with one or more associated merge requests.
- Does not have merge request: Vulnerabilities without an associated merge request.
- Solution available
- Has a solution: Vulnerabilities that can be resolved with an automated merge request.
- Does not have a solution: Vulnerabilities that don’t have an automated merge request resolution available.
- GitLab Duo resolution:
- Vulnerability Resolution available: Vulnerabilities with an available AI resolution.
- Vulnerability Resolution unavailable: Vulnerabilities without an available AI resolution.
- GitLab Duo FP detection:
- False positive: Vulnerabilities marked as likely false positives by GitLab Duo.
- Not identified as false positive: Vulnerabilities not identified as false positives or not marked by GitLab Duo.
The GitLab Duo (AI) filter is available when:
- Security Center vulnerability report: Any project in the Security Center has its GitLab Duo toggle turned on.
- Group vulnerability report: For the group, GitLab Duo features is set to On by default.
- Project vulnerability report: For the project, the GitLab Duo toggle is turned on.
Reachability filter
For groups and projects, you can filter vulnerabilities based on the reachability value. By default, the vulnerability report lists vulnerabilities with any reachability value.
This filter requires advanced vulnerability management.
Validity check filter
For groups and projects, you can filter vulnerabilities based on the validity check value. By default, the vulnerability report lists vulnerabilities with the possibly active status.
This filter requires advanced vulnerability management.
Grouping vulnerabilities
You can group vulnerabilities on the vulnerability report page to more efficiently triage them.
You can group by:
- Status
- Severity
- Report Type
- Scanner
- OWASP top 10 2017
- OWASP top 10 2021 (requires advanced vulnerability management)
Group vulnerabilities
To group vulnerabilities:
- In the top bar, select Search or go to and find your project or group.
- In the left sidebar, select Secure > Vulnerability report.
- From the Group By dropdown list, select a group.
Vulnerabilities are grouped according to the group you selected. Each group is collapsed, with the total number of vulnerabilities per group displayed beside their name. To see the vulnerabilities in each group, select the group’s name.
View details of a vulnerability
To view more details of a vulnerability, select the vulnerability’s Description. The vulnerability’s details page is opened.
Change status of vulnerabilities
As you triage vulnerabilities you can change their status, including dismissing vulnerabilities.
When a vulnerability is dismissed, the audit log includes a note of who dismissed it, when it was dismissed, and the reason it was dismissed. You cannot delete vulnerability records, so a permanent record always remains.
Prerequisites:
- You must have the Security Manager, Maintainer or Owner role for the project. The
admin_vulnerabilitypermission was removed from the Developer role in GitLab 17.0.
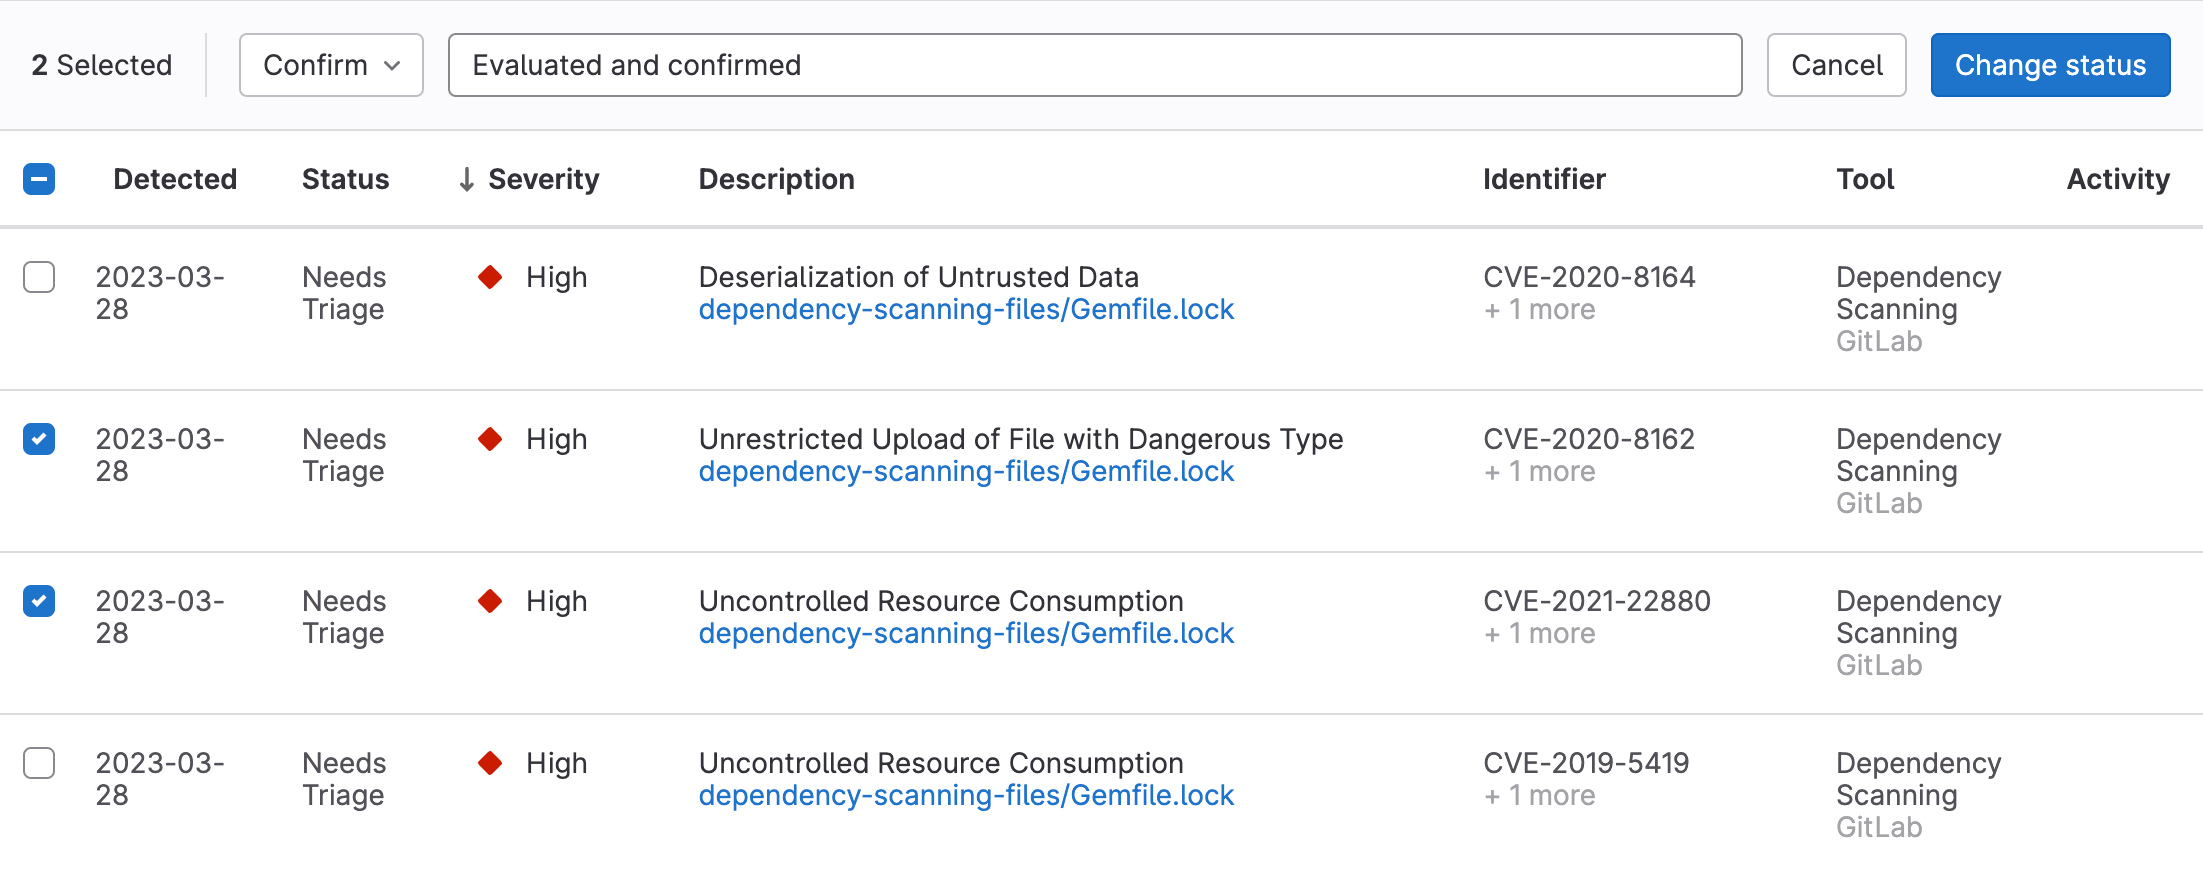
To change the status of vulnerabilities:
- In the top bar, select Search or go to and find your project.
- In the left sidebar, select Secure > Vulnerability report.
- To select:
- One or more vulnerabilities, select the checkbox beside each vulnerability.
- All vulnerabilities on the page, select the checkbox in the table header.
- In the Set status dropdown list, select the desired status.
- If the Dismiss status is chosen, select the desired reason in the Set dismissal reason dropdown list.
- In the Add a comment input, you can provide a comment. For the Dismiss status, a comment is required.
- Select Change status.
The status of the selected vulnerabilities is updated and the content of the vulnerability report is refreshed.
Change or override vulnerability severity
The availability of this feature is controlled by a feature flag. For more information, see the history.
In certain cases, you may need to adjust the severity of a detected vulnerability to better reflect your organization’s priorities. For instance, a scanner might report a lower severity, but you might consider it more critical based on your environment or setup. This feature allows you to override the default severity assigned by the scanner.
Prerequisites:
- You must have the Security Manager, Maintainer or Owner role for the project or the
admin_vulnerabilitypermission.
To manually override a vulnerability’s severity:
- In the top bar, select Search or go to and find your project.
- Go to Secure > Vulnerability report.
- Select vulnerabilities:
- To select individual vulnerabilities, select the checkbox beside each vulnerability.
- To select all vulnerabilities on the page, select the checkbox in the table header.
- In the Select action dropdown list, select Change severity.
- In the Select severity dropdown list, select the desired severity level.
- In the Add reason for the severity change (required) text box, add a brief explanation of why you’re changing the severity.
- Select Change severity.
For each selected vulnerability:
- Its severity is updated in both the Vulnerability details page and the Vulnerability report.
- A badge is added to its severity, indicating that the severity has been overridden.
- Manual severity adjustments are recorded in the vulnerability’s history.

Prevent users from overriding vulnerability severities
The availability of this feature is controlled by a feature flag. For more information, see the history.
In some environments, you might need to prevent users from overriding the severity of vulnerabilities. The hide_vulnerability_severity_override feature flag allows administrators to hide the severity override functionality in the vulnerability report. This feature helps organizations maintain standardized vulnerability severity ratings across projects.
When enabled, this feature:
- Hides the Change severity option from the action dropdown list in the vulnerability report.
- Prevents users from manually changing severity levels through the UI, ensuring consistent vulnerability scoring based on scanner results.
- Disables all API endpoints related to the modification of vulnerability severities, maintaining consistency across all access methods.
To enable the hide_vulnerability_severity_override flag, see enable and disable GitLab features deployed behind feature flags.
Add vulnerabilities to an existing issue
You can link one or more vulnerabilities to existing issues in the vulnerability report.
Prerequisites:
- You must have the Security Manager, Maintainer or Owner role for the project or the
admin_vulnerabilitypermission in a custom role. Theadmin_vulnerabilitypermission was removed from the Developer role in GitLab 17.0.
To attach vulnerabilities to an existing issue:
- In the top bar, select Search or go to and find your project or group.
- Go to Secure > Vulnerability report.
- Select vulnerabilities:
- To select individual vulnerabilities, select the checkbox beside each vulnerability.
- To select all vulnerabilities on the page, select the checkbox in the table header.
- In the Select action dropdown list, select Attach to existing issue.
- In the Enter issue URL or <#issue ID> text box, enter the ID of an issue to autocomplete, or add the URL of the issue. You can enter multiple issues to add the vulnerabilities to.
- Select Add.
Each selected vulnerability will be linked to all of the specified issues.

Add vulnerabilities to a new issue
You can link one or more vulnerabilities to a new issue.
Prerequisites:
- You must have the Security Manager, Maintainer or Owner role for the project or the
admin_vulnerabilitypermission in a custom role. Theadmin_vulnerabilitypermission was removed from the Developer role in GitLab 17.0.
To attach vulnerabilities to a new issue:
- In the top bar, select Search or go to and find your project or group.
- Go to Secure > Vulnerability report.
- Select vulnerabilities:
- To select individual vulnerabilities, select the checkbox beside each vulnerability.
- To select all vulnerabilities on the page, select the checkbox in the table header.
- In the Select action dropdown list, select Attach to new issue.
- Select Create issue.
You will be redirected to a new issue. Each selected vulnerability is already linked to it.

Sort vulnerabilities by date detected
By default, vulnerabilities are sorted by severity level, with the highest-severity vulnerabilities listed at the top.
To sort vulnerabilities by the date each vulnerability was detected, select the “Detected” column header.
Exporting
You can export details of the vulnerabilities listed in the vulnerability report. The export format is CSV (comma separated values). All vulnerabilities are included because filters do not apply to the export.
Fields included are:
- Status (See the following table for details of how the status value is exported.)
- Group name
- Project name
- Report type
- Scanner name
- Vulnerability
- Basic details
- Additional information
- Severity
- CVE (Common Vulnerabilities and Exposures)
- CWE (Common Weakness Enumeration)
- Other identifiers
- Detected At
- Location
- Activity: Returns
trueif the vulnerability is resolved on the default branch, andfalseif not. - Comments
- Full Path
- CVSS Vectors
- Dismissal Reason
- Vulnerability ID
Full details are available through our
Job Artifacts API.
Use one of the gl-*-report.json report filenames in place of *artifact_path
to obtain, for example, the path of files in which vulnerabilities were detected.
The Status field’s values shown in the vulnerability report are different to those contained in the vulnerability export. Use the following reference table to match them.
| Vulnerability report | Vulnerability export |
|---|---|
| Needs triage | detected |
| Dismissed | dismissed |
| Resolved | resolved |
| Confirmed | confirmed |
Export details
To export details of all vulnerabilities listed in the vulnerability report, select Export.
When the exported details are available, you’ll receive an email. To download the exported details, select the link in the email.
Some CSV readers have limitations on the number of rows or size of columns which may make them incompatible with larger exports. The vulnerability export does not account for the limitations of individual programs.
Manually add a vulnerability
Add a vulnerability manually when it is not available in the GitLab vulnerabilities database. You can add a vulnerability only in a project’s vulnerability report.
To add a vulnerability manually:
- In the top bar, select Search or go to and find your project.
- In the left sidebar, select Secure > Vulnerability report.
- Select Submit vulnerability.
- Complete the fields and submit the form.
The newly-created vulnerability’s detail page is opened.
Advanced vulnerability management
GitLab primarily uses PostgreSQL for filtering in the vulnerability report. Due to database indexing limitations and performance challenges when applying multiple filters, GitLab uses advanced search for specific vulnerability management features.
Advanced search powers the following features:
- Grouping data by OWASP 2021 categories in the vulnerability report for a project or group.
- Filtering based on a vulnerability’s identifier in the vulnerability report for a project or group.
- Filtering based on the reachability value in the vulnerability report for a project or group.
- Filtering based on the validity check status in the vulnerability report for a project or group.
- Filtering based on the policy violation bypass reason in the vulnerability report for a project or group.
- Filtering the panels and entire dashboard data in the new security dashboard.
Advanced search is used only for these specific features, including when they are combined with other filters. Other filters, when used independently, continue to use the standard PostgreSQL filtering.
On GitLab Self-Managed, advanced vulnerability management capabilities might be temporarily unavailable, typically for a few hours, after upgrading from versions earlier than GitLab 18.7 while the data migration completes. Full capabilities will be available after the migration finishes.
Requirements
To use the capabilities in advanced vulnerability management:
- You must have advanced search enabled.
- On GitLab Self-Managed, after setting up advanced search, ensure the Search with advanced search checkbox is selected.
Operational vulnerabilities
The Operational vulnerabilities tab lists vulnerabilities found by Operational container scanning. This tab appears on the project, group, and Security Center vulnerability reports.