Sec section development guidelines
The Sec section is responsible for GitLab application security features, the “Sec” part of DevSecOps. Development guides that are specific to the Sec section are listed here.
See Terminology for an overview of our shared terminology.
Architecture
Security inventory
Overview
The architecture supporting the Secure features is split into two main parts:
- Scanning
- Processing, visualization, and management
flowchart LR
  subgraph G1[Scanning]
    Scanner
    Analyzer
    CI[CI Jobs]
  end
  subgraph G2[Processing, visualization, and management]
   Parsers
   Database
   Views
   Interactions
  end
  G1 --Report Artifact--> G2
Scanning
The scanning part is responsible for finding vulnerabilities in given resources, and exporting results. The scans are executed in CI/CD jobs via several small projects called Analyzers, which can be found in our Analyzers subgroup. The Analyzers are wrappers around security tools called Scanners, developed internally or externally, to integrate them into GitLab. The Analyzers are mainly written in Go.
Some 3rd party integrators also make additional Scanners available by following our integration documentation, which leverages the same architecture.
The results of the scans are exported as JSON reports that must comply with the Secure report format and are uploaded as CI/CD Job Report artifacts to make them available for processing after the pipelines completes.
Processing, visualization, and management
After the data is available as a Report Artifact it can be processed by the GitLab Rails application to enable our security features, including:
- Security Dashboards, Merge Request widget, Pipeline view, and so on.
- Security scan results.
- Approval rules.
Depending on the context, the security reports may be stored either in the database or stay as Report Artifacts for on-demand access.
Security report ingestion overview
For details on how GitLab processes the reports generated by the scanners, see Security report ingestion overview.
CI/CD template development
While CI/CD templates are the responsibility of the Verify section, many are critical to the Sec Section’s feature usage. If you are working with CI/CD templates, read the development guide for GitLab CI/CD templates.
Importance of the primary identifier
Within analyzer JSON reports, the identifiers field contains a collection of types and categories by which
a vulnerability can be described (that is, a CWE family).
The first item in the identifiers collection is known as the primary identifier,
a critical component to both describing and tracking vulnerabilities.
In most other cases, the identifiers collection is unordered, where the remaining secondary identifiers act as metadata for grouping vulnerabilities
(see Analyzer vulnerability translation below for the exception).
Any time the primary identifier changes and a project pipeline is re-run, ingestion of the new report will “orphan” the previous DB record. Because our processing logic relies on generating a delta of two different vulnerabilities, it can end up looking rather confusing. For example:
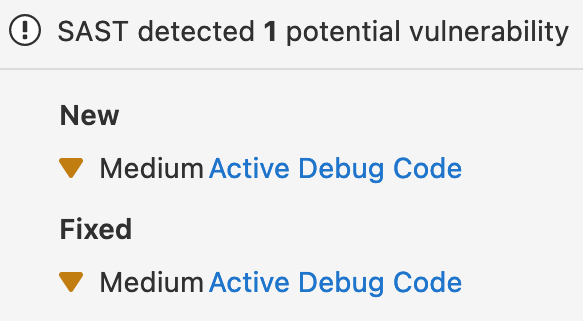
After being merged, the previous vulnerability record’s status is changed to Resolved and the new vulnerability record’s status is set to Needs triage.
Guiding principles for ensuring primary identifier stability
- A primary identifier should never change unless we have a compelling reason.
- Analyzer supporting vulnerability translation must include the legacy primary identifiers in a secondary position to prevent “orphaning” of results.
- Beyond the primary identifier, the order of secondary identifiers does not matter.
- The identifier is unique based on a combination of the
TypeandValuefields (see identifier fingerprint). - If we change the primary identifier, rolling back analyzers to previous versions will not fix the orphaned results. The data previously ingested into our database is an artifact of previous jobs with few ways of automating data migrations.
Analyzer vulnerability translation
In the case of the SAST Semgrep analyzer, there is a secondary identifier of particular importance: the identifier linking the report’s vulnerability to the legacy analyzer (that is, bandit or ESLint).
To enable vulnerability translation the Semgrep analyzer relies on a secondary identifier exactly matching the primary identifier of the legacy analyzer.
For example, when eslint was previously used to generate vulnerability records,
the semgrep analyzer must produce an identifier collection containing the
original ESLint primary identifier.
Given the original eslint report:
{
  "version": "14.0.4",
  "vulnerabilities": [
    {
      "identifiers": [
        {
          "type": "eslint_rule_id",
          "name": "ESLint rule ID security/detect-eval-with-expression",
          "value": "security/detect-eval-with-expression"
        }
      ]
    }
  ]
}
The corresponding Semgrep report must contain the eslint_rule_id:
{
  "version": "14.0.4",
  "vulnerabilities": [
    {
      "identifiers": [
        {
          "type": "semgrep_id",
          "name": "eslint.detect-eval-with-expression",
          "value": "eslint.detect-eval-with-expression",
          "url": "https://semgrep.dev/r/gitlab.eslint.detect-eval-with-expression"
        },
        {
          "type": "eslint_rule_id",
          "name": "ESLint rule ID security/detect-eval-with-expression",
          "value": "security/detect-eval-with-expression"
        }
      ]
    }
  ]
}
Tracking of vulnerabilities relies on a combination of the two identifiers
to remap DB records previously generated with the legacy analyzers to those generated with the new semgrep ones.
Development Setup: Package Metadata Database synchronization
For security scanning and license compliance features that use the Package Metadata Database (PMDB), you need to set up PMDB synchronization in your development environment.
See the Package Metadata Synchronization guide in the GDK documentation for detailed setup instructions.