Tutorial: Create and run your first GitLab CI/CD pipeline
- Tier: Free, Premium, Ultimate
- Offering: GitLab.com, GitLab Self-Managed, GitLab Dedicated
This tutorial shows you how to configure and run your first CI/CD pipeline in GitLab.
If you are already familiar with basic CI/CD concepts, you can learn about common keywords in Tutorial: Create a complex pipeline.
Prerequisites
Before you start, make sure you have:
- A project in GitLab that you would like to use CI/CD for.
- The Maintainer or Owner role for the project.
If you don’t have a project, you can create a public project for free on https://gitlab.com.
Steps
To create and run your first pipeline:
Ensure you have runners available to run your jobs.
If you’re using GitLab.com, you can skip this step. GitLab.com provides instance runners for you.
Create a
.gitlab-ci.ymlfile at the root of your repository. This file is where you define the CI/CD jobs.
When you commit the file to your repository, the runner runs your jobs. The job results are displayed in a pipeline.
Ensure you have runners available
In GitLab, runners are agents that run your CI/CD jobs.
If you’re using GitLab.com, you can skip this step. GitLab.com provides instance runners for you.
To view available runners:
- In the top bar, select Search or go to and find your project.
- In the left sidebar, select Settings > CI/CD.
- Expand Runners.
As long as you have at least one runner that’s active, with a green circle next to it, you have a runner available to process your jobs.
If you don’t have access to these settings, contact your GitLab administrator.
If you don’t have a runner
If you don’t have a runner:
- Install GitLab Runner on your local machine.
- Register the runner for your project.
Choose the
shellexecutor.
When your CI/CD jobs run, in a later step, they will run on your local machine.
Create a .gitlab-ci.yml file
Now create a .gitlab-ci.yml file. It is a YAML file where
you specify instructions for GitLab CI/CD.
In this file, you define:
- The structure and order of jobs that the runner should execute.
- The decisions the runner should make when specific conditions are encountered.
To create a .gitlab-ci.yml file in your project:
In the top bar, select Search or go to and find your project.
In the left sidebar, select Code > Repository.
Above the file list, select the branch you want to commit to. If you’re not sure, leave
masterormain. Then, in the upper-right corner, select the plus icon ( ) and New file: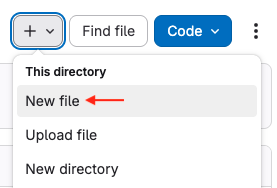
For the Filename, type
.gitlab-ci.ymland in the larger window, paste this sample code:build-job: stage: build script: - echo "Hello, $GITLAB_USER_LOGIN!" test-job1: stage: test script: - echo "This job tests something" test-job2: stage: test script: - echo "This job tests something, but takes more time than test-job1." - echo "After the echo commands complete, it runs the sleep command for 20 seconds" - echo "which simulates a test that runs 20 seconds longer than test-job1" - sleep 20 deploy-prod: stage: deploy script: - echo "This job deploys something from the $CI_COMMIT_BRANCH branch." environment: productionThis example shows four jobs:
build-job,test-job1,test-job2, anddeploy-prod. The comments listed in theechocommands are displayed in the UI when you view the jobs. The values for the predefined variables$GITLAB_USER_LOGINand$CI_COMMIT_BRANCHare populated when the jobs run.Select Commit changes.
The pipeline starts and runs the jobs you defined in the .gitlab-ci.yml file.
View the status of your pipeline and jobs
Now take a look at your pipeline and the jobs within.
Go to Build > Pipelines. A pipeline with three stages should be displayed:

View a visual representation of your pipeline by selecting the pipeline ID (
#2435445330in this example):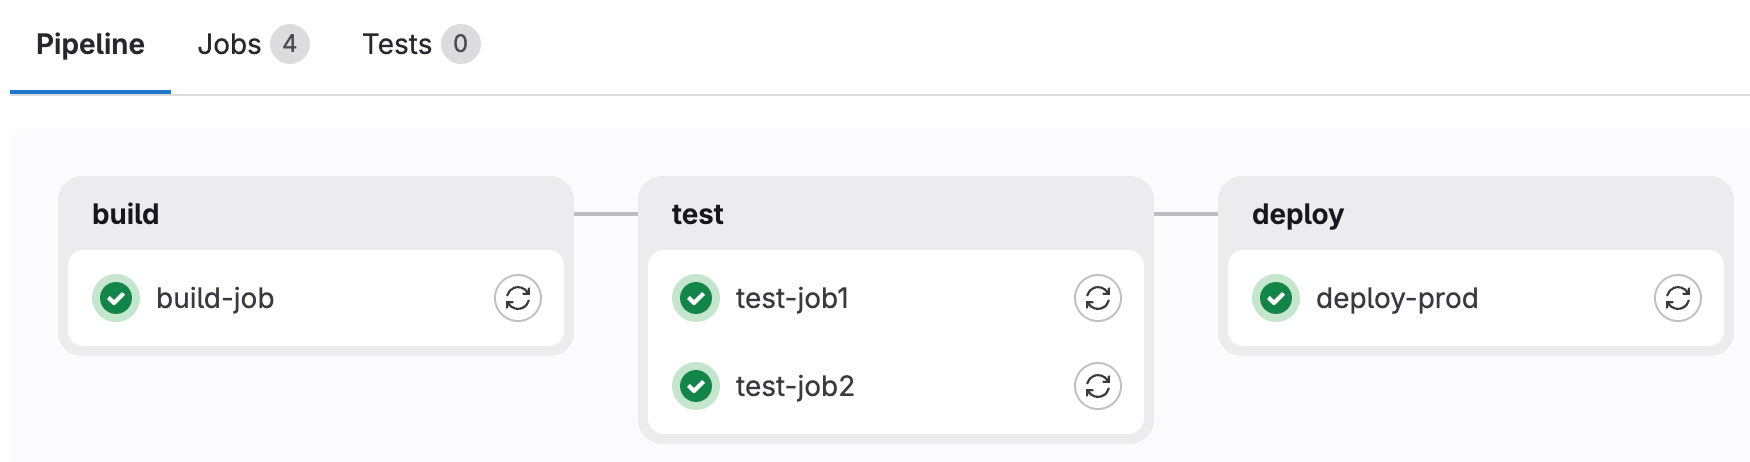
View details of a job by selecting the job name. For example,
deploy-prod:
You have successfully created your first CI/CD pipeline in GitLab. Congratulations!
Now you can get started customizing your .gitlab-ci.yml and defining more advanced jobs.
.gitlab-ci.yml tips
Here are some tips to get started working with the .gitlab-ci.yml file.
For the complete .gitlab-ci.yml syntax, see the full CI/CD YAML syntax reference.
- Use the pipeline editor to edit your
.gitlab-ci.ymlfile. - Each job contains a script section and belongs to a stage:
stagedescribes the sequential execution of jobs. If there are runners available, jobs in a single stage run in parallel.- Use the
needskeyword to run jobs out of stage order, to increase pipeline speed and efficiency.
- You can set additional configuration to customize how your jobs and stages perform:
- Use the
ruleskeyword to specify when to run or skip jobs. Theonlyandexceptlegacy keywords are still supported, but can’t be used withrulesin the same job. - Keep information across jobs and stages persistent in a pipeline with
cacheandartifacts. These keywords are ways to store dependencies and job output, even when using ephemeral runners for each job. - Use the
defaultkeyword to specify additional configurations that are applied to all jobs. This keyword is often used to definebefore_scriptandafter_scriptsections that should run on every job.
- Use the
Related topics
Migrate from: