- Types of pipelines
- Configure a pipeline
- Trigger a pipeline when an upstream project is rebuilt
- View pipelines
- Pipeline success and duration charts
- Pipeline badges
- Pipelines API
- Ref specs for runners
CI/CD pipelines
Pipelines are the top-level component of continuous integration, delivery, and deployment.
Pipelines comprise:
- Jobs, which define what to do. For example, jobs that compile or test code.
- Stages, which define when to run the jobs. For example, stages that run tests after stages that compile the code.
Jobs are executed by runners. Multiple jobs in the same stage are executed in parallel, if there are enough concurrent runners.
If all jobs in a stage succeed, the pipeline moves on to the next stage.
If any job in a stage fails, the next stage is not (usually) executed and the pipeline ends early.
In general, pipelines are executed automatically and require no intervention once created. However, there are also times when you can manually interact with a pipeline.
A typical pipeline might consist of four stages, executed in the following order:
- A
buildstage, with a job calledcompile. - A
teststage, with two jobs calledtest1andtest2. - A
stagingstage, with a job calleddeploy-to-stage. - A
productionstage, with a job calleddeploy-to-prod.
Types of pipelines
Pipelines can be configured in many different ways:
- Basic pipelines run everything in each stage concurrently, followed by the next stage.
- Directed Acyclic Graph Pipeline (DAG) pipelines are based on relationships between jobs and can run more quickly than basic pipelines.
- Merge request pipelines run for merge requests only (rather than for every commit).
- Merged results pipelines are merge request pipelines that act as though the changes from the source branch have already been merged into the target branch.
- Merge trains use merged results pipelines to queue merges one after the other.
- Parent-child pipelines break down complex pipelines into one parent pipeline that can trigger multiple child sub-pipelines, which all run in the same project and with the same SHA. This pipeline architecture is commonly used for mono-repos.
- Multi-project pipelines combine pipelines for different projects together.
Configure a pipeline
Pipelines and their component jobs and stages are defined in the CI/CD pipeline configuration file for each project.
For a list of configuration options for the CI/CD configuration file, see the CI/CD YAML syntax reference.
You can also configure specific aspects of your pipelines through the GitLab UI. For example:
- Pipeline settings for each project.
- Pipeline schedules.
- Custom CI/CD variables.
The recommended tool for editing CI/CD configuration is the pipeline editor.
If you use VS Code to edit your GitLab CI/CD configuration, the GitLab Workflow VS Code extension helps you validate your configuration and view your pipeline status.
Run a pipeline manually
Pipelines can be manually executed, with predefined or manually-specified variables.
You might do this if the results of a pipeline (for example, a code build) are required outside the standard operation of the pipeline.
To execute a pipeline manually:
- On the left sidebar, select Search or go to and find your project.
- Select Build > Pipelines.
- Select Run pipeline.
- In the Run for branch name or tag field, select the branch or tag to run the pipeline for.
- Enter any CI/CD variables required for the pipeline to run. You can set specific variables to have their values prefilled in the form.
- Select Run pipeline.
The pipeline now executes the jobs as configured.
Prefill variables in manual pipelines
You can use the description and value
keywords to define pipeline-level (global) variables
that are prefilled when running a pipeline manually. Use the description to explain
information such as what the variable is used for, and what the acceptable values are.
Job-level variables cannot be pre-filled.
In manually-triggered pipelines, the Run pipeline page displays all pipeline-level variables
that have a description defined in the .gitlab-ci.yml file. The description displays
below the variable.
You can change the prefilled value, which overrides the value for that single pipeline run.
Any variables overridden by using this process are expanded
and not masked.
If you do not define a value for the variable in the configuration file, the variable name is still listed,
but the value field is blank.
For example:
variables:
  DEPLOY_CREDENTIALS:
    description: "The deployment credentials."
  DEPLOY_ENVIRONMENT:
    description: "Select the deployment target. Valid options are: 'canary', 'staging', 'production', or a stable branch of your choice."
    value: "canary"
In this example:
-
DEPLOY_CREDENTIALSis listed in the Run pipeline page, but with no value set. The user is expected to define the value each time the pipeline is run manually. -
DEPLOY_ENVIRONMENTis pre-filled in the Run pipeline page withcanaryas the default value, and the message explains the other options.
Configure a list of selectable prefilled variable values
-
Introduced in GitLab 15.5 with a flag named
run_pipeline_graphql. Disabled by default. - The
optionskeyword was introduced in GitLab 15.7. -
Generally available in GitLab 15.7. Feature flag
run_pipeline_graphqlremoved. - The variables list sometimes did not populate correctly due to a bug, which was resolved in GitLab 15.9.
You can define an array of CI/CD variable values the user can select from when running a pipeline manually.
These values are in a dropdown list in the Run pipeline page. Add the list of
value options to options and set the default value with value. The string in value
must also be included in the options list.
For example:
variables:
  DEPLOY_ENVIRONMENT:
    value: "staging"
    options:
      - "production"
      - "staging"
      - "canary"
    description: "The deployment target. Set to 'staging' by default."
Run a pipeline by using a URL query string
You can use a query string to pre-populate the Run Pipeline page. For example, the query string
.../pipelines/new?ref=my_branch&var[foo]=bar&file_var[file_foo]=file_bar pre-populates the
Run Pipeline page with:
-
Run for field:
my_branch. -
Variables section:
- Variable:
- Key:
foo - Value:
bar
- Key:
- File:
- Key:
file_foo - Value:
file_bar
- Key:
- Variable:
The format of the pipelines/new URL is:
.../pipelines/new?ref=<branch>&var[<variable_key>]=<value>&file_var[<file_key>]=<value>
The following parameters are supported:
-
ref: specify the branch to populate the Run for field with. -
var: specify aVariablevariable. -
file_var: specify aFilevariable.
For each var or file_var, a key and value are required.
Add manual interaction to your pipeline
Manual jobs, allow you to require manual interaction before moving forward in the pipeline.
You can do this straight from the pipeline graph. Just select the play button to execute that particular job.
For example, your pipeline can start automatically, but require a manual action to
deploy to production.
In the example below, the production stage has a job with a manual action:
Start all manual jobs in a stage
If a stage contains only manual jobs, you can start all the jobs at the same time by selecting Play all manual () above the stage. If the stage contains non-manual jobs, the option is not displayed.
Skip a pipeline
To push a commit without triggering a pipeline, add [ci skip] or [skip ci], using any
capitalization, to your commit message.
Alternatively, with Git 2.10 or later, use the ci.skip Git push option.
The ci.skip push option does not skip merge request pipelines.
Delete a pipeline
Users with the Owner role for a project can delete a pipeline:
- On the left sidebar, select Search or go to and find your project.
- Select Build > Pipelines.
- Select either the pipeline ID (for example
#123456789) or the pipeline status icon (for example Passed) of the pipeline to delete. - In the top right of the pipeline details page, select Delete.
Deleting a pipeline does not automatically delete its child pipelines. See issue 39503 for more details.
Pipeline security on protected branches
A strict security model is enforced when pipelines are executed on protected branches.
The following actions are allowed on protected branches if the user is allowed to merge or push to that specific branch:
- Run manual pipelines (using the Web UI or pipelines API).
- Run scheduled pipelines.
- Run pipelines using triggers.
- Run on-demand DAST scan.
- Trigger manual actions on existing pipelines.
- Retry or cancel existing jobs (using the Web UI or pipelines API).
Variables marked as protected are accessible to jobs that run in pipelines for protected branches. Only assign users the right to merge to protected branches if they have permission to access sensitive information like deployment credentials and tokens.
Runners marked as protected can run jobs only on protected branches, preventing untrusted code from executing on the protected runner and preserving deployment keys and other credentials from being unintentionally accessed. To ensure that jobs intended to be executed on protected runners do not use regular runners, they must be tagged accordingly.
Review the deployment safety page for additional security recommendations for securing your pipelines.
Trigger a pipeline when an upstream project is rebuilt
You can trigger a pipeline in your project whenever a pipeline finishes for a new tag in a different project.
Prerequisites:
- The upstream project must be public.
- The user must have the Developer role in the upstream project.
To trigger the pipeline when the upstream project is rebuilt:
- On the left sidebar, select Search or go to and find your project.
- Select Settings > CI/CD.
- Expand Pipeline subscriptions.
- Select Add project.
- Enter the project you want to subscribe to, in the format
<namespace>/<project>. For example, if the project ishttps://gitlab.com/gitlab-org/gitlab, usegitlab-org/gitlab. - Select Subscribe.
Any pipelines that complete successfully for new tags in the subscribed project now trigger a pipeline on the current project’s default branch. The maximum number of upstream pipeline subscriptions is 2 by default, for both the upstream and downstream projects. On self-managed instances, an administrator can change this limit.
How pipeline duration is calculated
The total running time for a given pipeline excludes:
- The duration of the initial run for any job that is retried or manually re-run.
- Any pending (queue) time.
That means that if a job is retried or manually re-run, only the duration of the latest run is included in the total running time.
Each job is represented as a Period, which consists of:
-
Period#first(when the job started). -
Period#last(when the job finished).
A simple example is:
- A (0, 2)
- A’ (2, 4)
- This is retrying A
- B (1, 3)
- C (6, 7)
In the example:
- A begins at 0 and ends at 2.
- A’ begins at 2 and ends at 4.
- B begins at 1 and ends at 3.
- C begins at 6 and ends at 7.
Visually, it can be viewed as:
0  1  2  3  4  5  6  7
AAAAAAA
   BBBBBBB
      A'A'A'A
                  CCCC
Because A is retried, we ignore it and count only job A’. The union of B, A’, and C is (1, 4) and (6, 7). Therefore, the total running time is:
(4 - 1) + (7 - 6) => 4
View pipelines
To view all the pipelines that ran for your project:
- On the left sidebar, select Search or go to and find your project.
- Build > Pipelines page.
You can filter the pipeline list by:
- Trigger author
- Branch name
- Status
- Tag
- Source
Select Pipeline ID in the dropdown list in the top right to display the pipeline IDs (unique ID across the instance). Select pipeline IID to display the pipeline IIDs (internal ID, unique across the project only).
For example:

To view the pipelines that relate to a specific merge request, go to the Pipelines tab in the merge request.
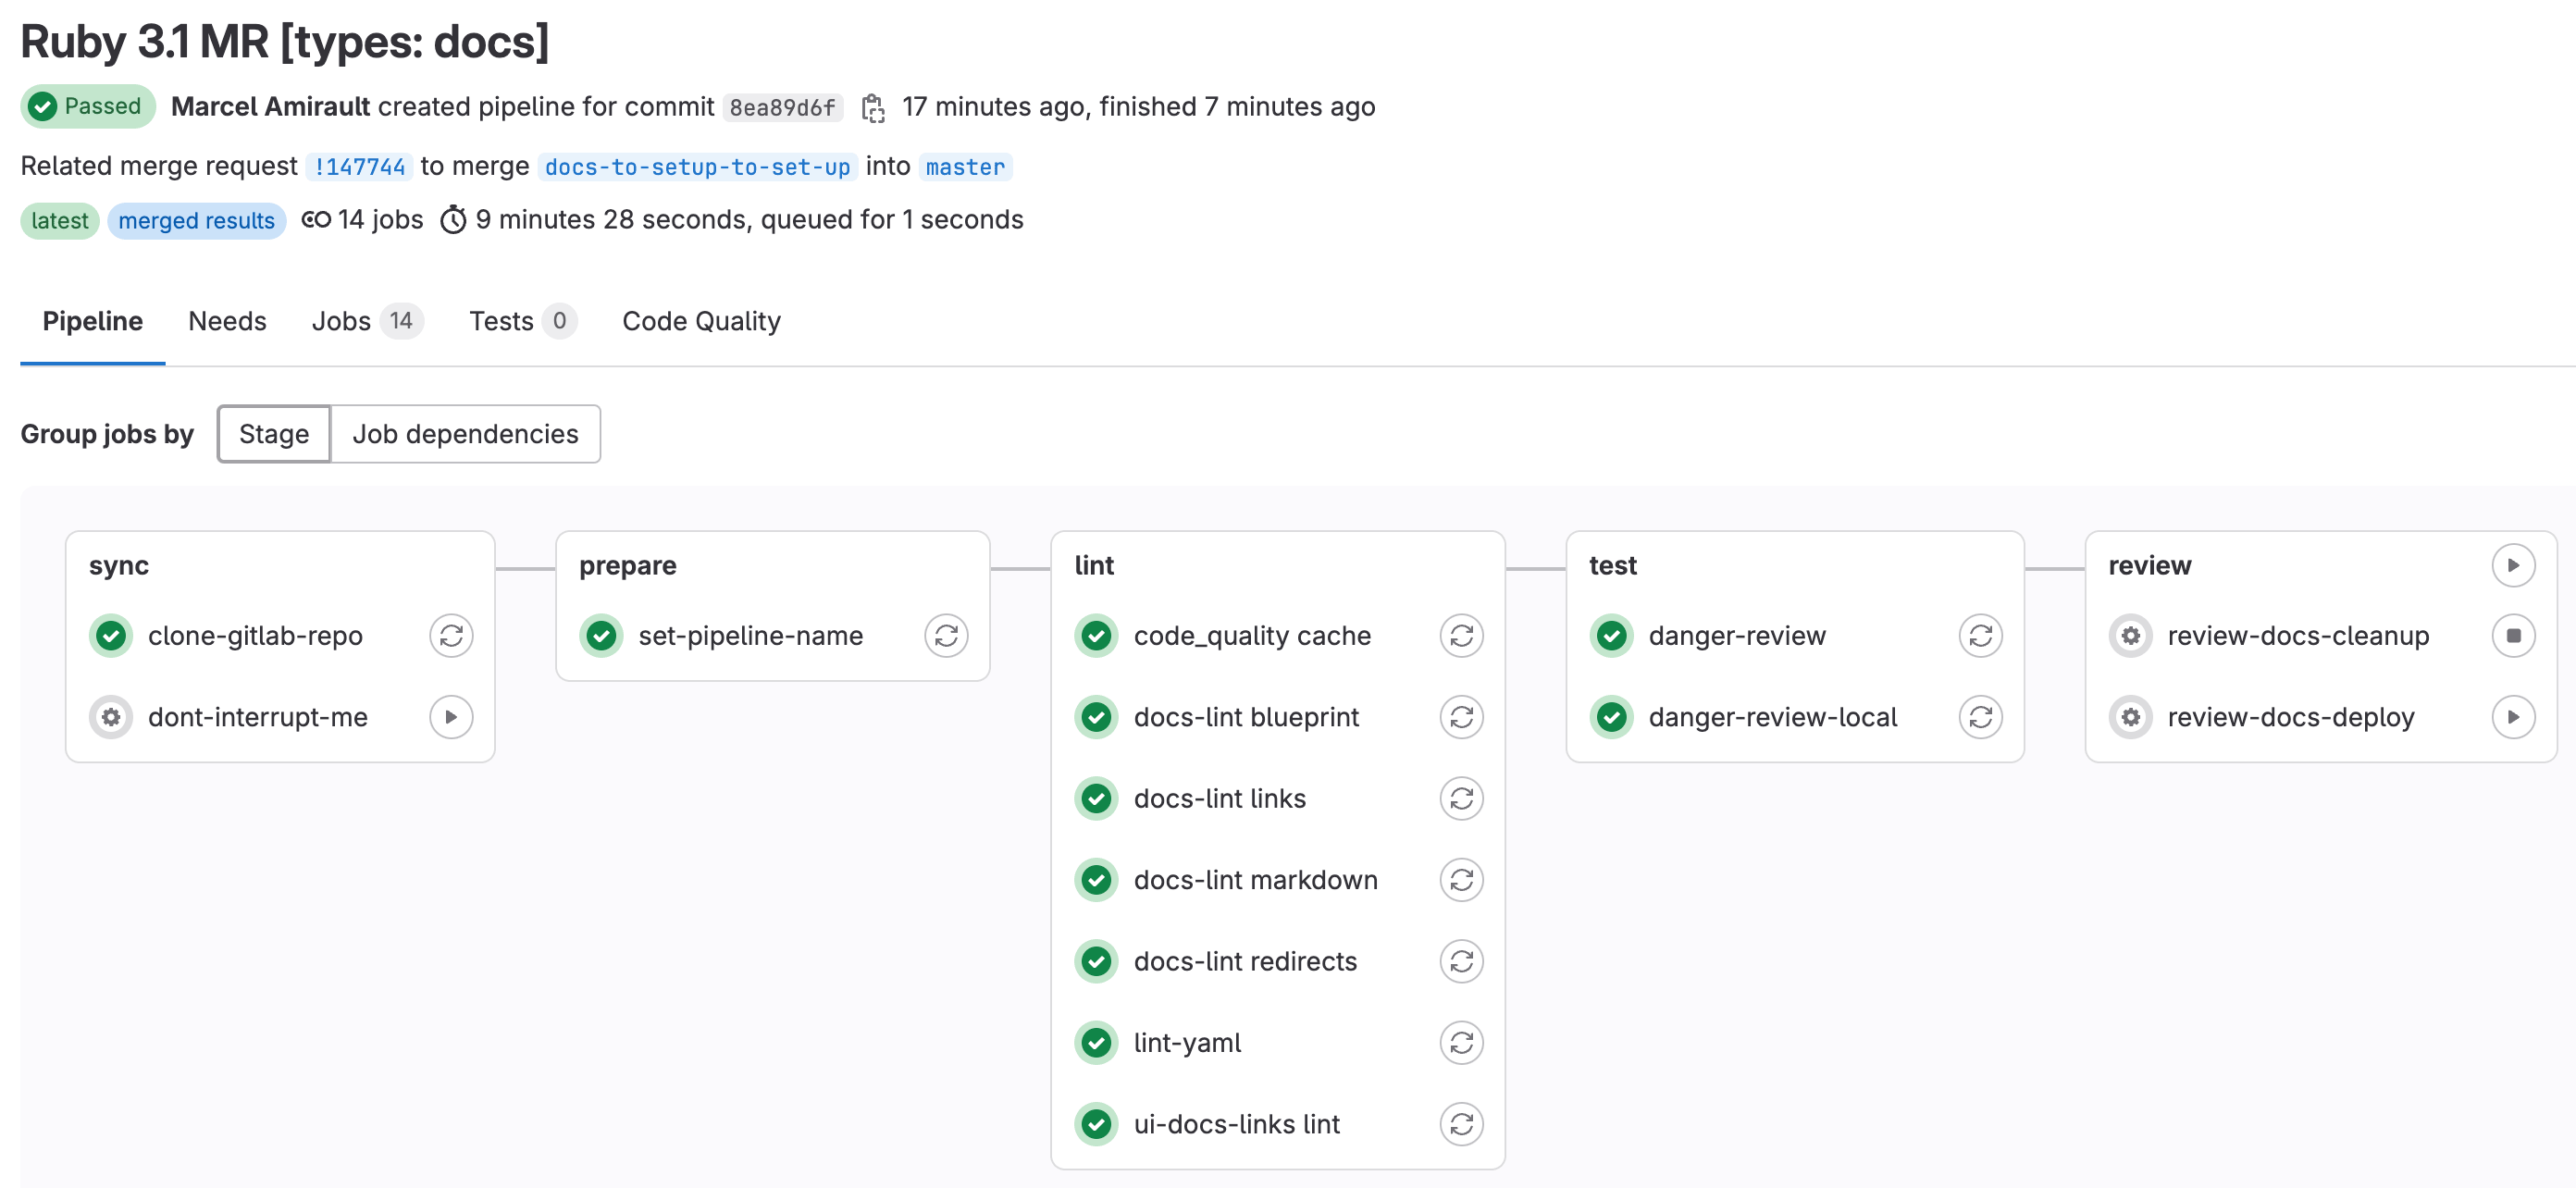
Pipeline details
- Pipeline detail view updated in GitLab 16.6 with a flag named
new_pipeline_graph. Disabled by default. - Updated pipeline detail view enabled on GitLab.com in GitLab 16.8.
Select a pipeline to open the pipeline details page which shows every job in the pipeline. From this page you can cancel a running pipeline, retry failed jobs, or delete a pipeline.
The pipeline details page displays a graph of all the jobs in the pipeline:
You can use a standard URL to access the details for specific pipelines:
-
gitlab.example.com/my-group/my-project/-/pipelines/pipelines/latest: The details page for the latest pipeline for the most recent commit on the default branch in the project. -
gitlab.example.com/my-group/my-project/-/pipelines/<branch>/latest: The details page for the latest pipeline for the most recent commit on branch<branch>in the project.
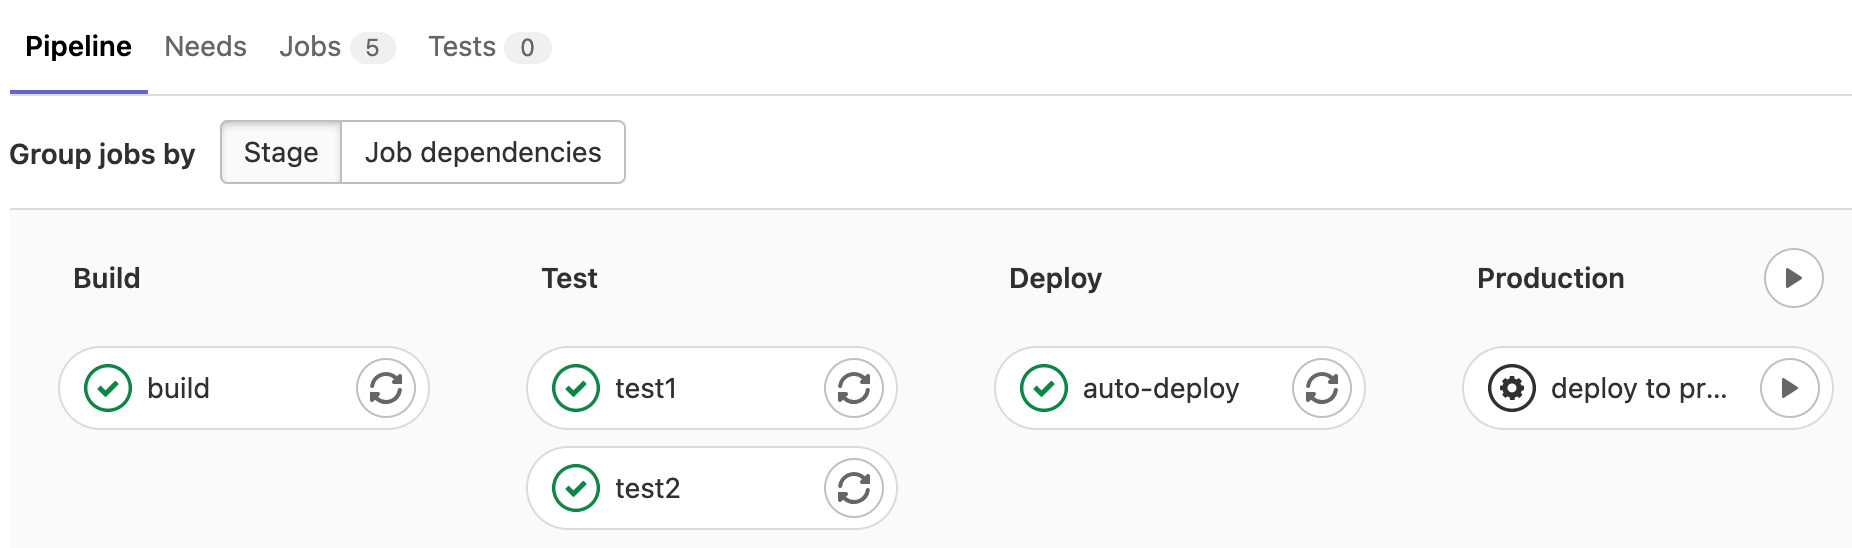
Group jobs by stage or needs configuration
When you configure jobs with the needs keyword, you have
two options for how to group the jobs in the pipeline details page. To group the jobs
by stage configuration, select stage in the Group jobs by section:

To group the jobs by needs configuration, select Job dependencies.
You can optionally select Show dependencies to render lines between dependent jobs,
similar to the needs visualization
in the pipeline editor:
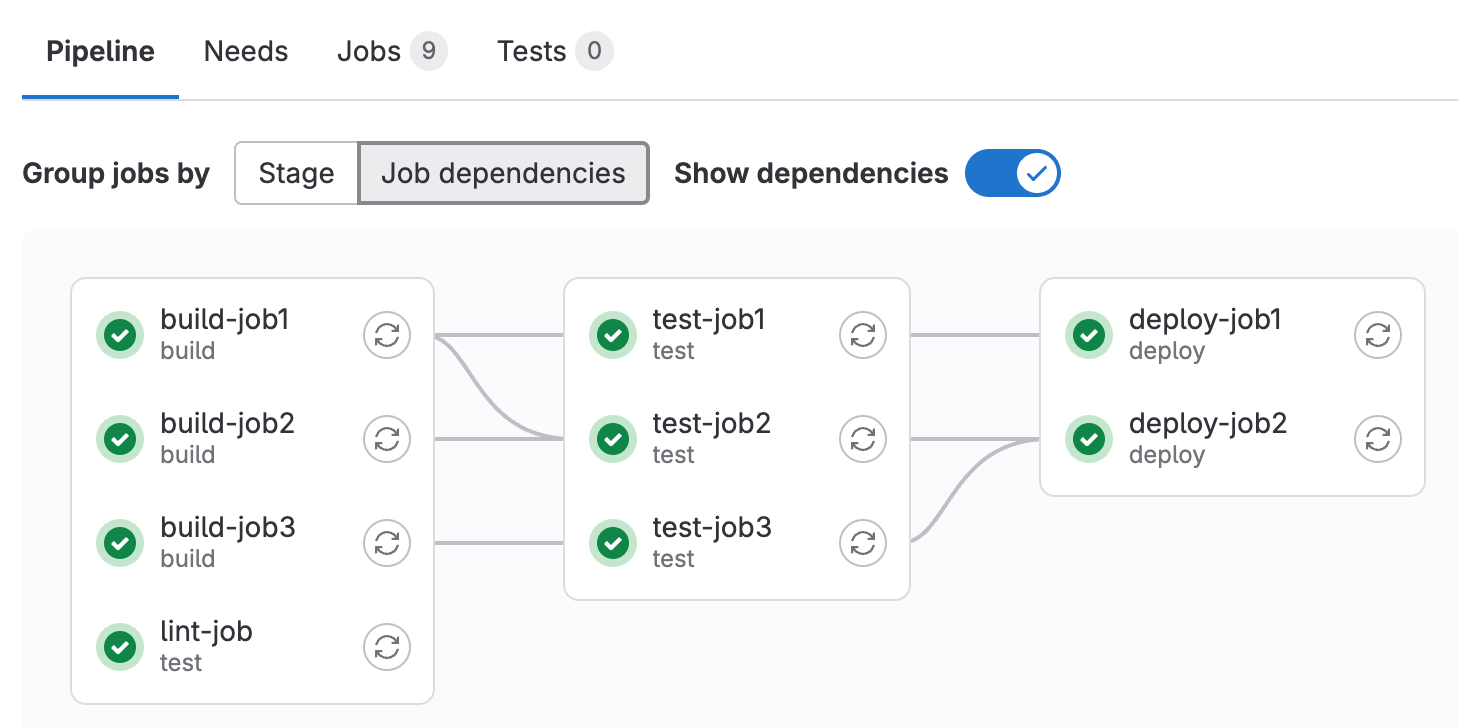
Jobs in the leftmost column run first, and jobs that depend on them are grouped in the next columns. In this example:
-
lint-jobis configured withneeds: []and depends on no jobs, so it displays in the first column, despite being in theteststage. -
test-job1depends onbuild-job1, andtest-job2depends on bothbuild-job1andbuild-job2, so both test jobs display in the second column. - Both
deployjobs depend on jobs in second column (which themselves depend on other earlier jobs), so the deploy jobs display in the third column.
When you hover over a job in the Job dependencies view, every job that must run before the selected job is highlighted:

Pipeline mini graphs
- Pipeline mini graph in the pipeline editor introduced in GitLab 14.5.
Pipeline mini graphs take less space and can tell you at a quick glance if all jobs passed or something failed. They show all related jobs for a single commit and the net result of each stage of your pipeline. You can quickly see what failed and fix it.
The pipeline mini graph always group jobs by stage, and display throughout GitLab when displaying pipeline or commit details.

Stages in pipeline mini graphs are expandable. Hover your mouse over each stage to see the name and status, and select a stage to expand its jobs list.
Downstream pipeline graphs
When a pipeline contains a job that triggers a downstream pipeline, you can see the downstream pipeline in the pipeline details view and mini graphs.
In the pipeline details view, a card displays for every triggered downstream pipeline on the right of the pipeline graph. Hover over a card to see which job triggered the downstream pipeline. Select a card to display the downstream pipeline to the right of the pipeline graph.
In the pipeline mini graph, the status of every triggered downstream pipeline displays as additional status icons to the right of the mini graph. Select a downstream pipeline status icon to go to the detail page of that downstream pipeline.
Pipeline success and duration charts
Pipeline analytics are available on the CI/CD Analytics page.
Pipeline badges
Pipeline status and test coverage report badges are available and configurable for each project. For information on adding pipeline badges to projects, see Pipeline badges.
Pipelines API
GitLab provides API endpoints to:
- Perform basic functions. For more information, see Pipelines API.
- Maintain pipeline schedules. For more information, see Pipeline schedules API.
- Trigger pipeline runs. For more information, see:
Ref specs for runners
When a runner picks a pipeline job, GitLab provides that job’s metadata. This includes the Git refspecs, which indicate which ref (such as branch or tag) and commit (SHA1) are checked out from your project repository.
This table lists the refspecs injected for each pipeline type:
| Pipeline type | Refspecs |
|---|---|
| pipeline for branches |
+<sha>:refs/pipelines/<id> and +refs/heads/<name>:refs/remotes/origin/<name>
|
| pipeline for tags |
+<sha>:refs/pipelines/<id> and +refs/tags/<name>:refs/tags/<name>
|
| merge request pipeline | +refs/pipelines/<id>:refs/pipelines/<id>
|
The refs refs/heads/<name> and refs/tags/<name> exist in your
project repository. GitLab generates the special ref refs/pipelines/<id> during a
running pipeline job. This ref can be created even after the associated branch or tag has been
deleted. It’s therefore useful in some features such as automatically stopping an environment,
and merge trains that might run pipelines after branch deletion.