- Introduction
- Initialize our Laravel app on GitLab
- Configure the production server
- Setting up Envoy
- Continuous Integration with GitLab
- Conclusion
Test and deploy Laravel applications with GitLab CI/CD and Envoy
Introduction
GitLab features our applications with Continuous Integration, and it is possible to easily deploy the new code changes to the production server whenever we want.
In this tutorial, we’ll show you how to initialize a Laravel application and set up our Envoy tasks, then we’ll jump into see how to test and deploy it with GitLab CI/CD via Continuous Delivery.
We assume you have a basic experience with Laravel, Linux servers, and you know how to use GitLab.
Laravel is a high quality web framework written in PHP. It has a great community with a fantastic documentation. Aside from the usual routing, controllers, requests, responses, views, and (blade) templates, out of the box Laravel provides plenty of additional services such as cache, events, localization, authentication, and many others.
We will use Envoy as an SSH task runner based on PHP. It uses a clean, minimal Blade syntax to set up tasks that can run on remote servers, such as, cloning your project from the repository, installing the Composer dependencies, and running Artisan commands.
Initialize our Laravel app on GitLab
We assume you have installed a new Laravel project, so let’s start with a unit test, and initialize Git for the project.
Unit Test
Every new installation of Laravel (currently 8.0) comes with two type of tests, ‘Feature’ and ‘Unit’, placed in the tests directory.
Here’s a unit test from test/Unit/ExampleTest.php:
<?php

namespace Tests\Unit;

...

class ExampleTest extends TestCase
{
    public function testBasicTest()
    {
        $this->assertTrue(true);
    }
}
This test is as simple as asserting that the given value is true.
Laravel uses PHPUnit for tests by default.
If we run vendor/bin/phpunit we should see the green output:
vendor/bin/phpunit
OK (1 test, 1 assertions)
This test will be used later for continuously testing our app with GitLab CI/CD.
Push to GitLab
Since we have our app up and running locally, it’s time to push the codebase to our remote repository.
Let’s create a new project in GitLab named laravel-sample.
After that, follow the command line instructions displayed on the project’s homepage to initiate the repository on our machine and push the first commit.
cd laravel-sample
git init
git remote add origin git@gitlab.example.com:<USERNAME>/laravel-sample.git
git add .
git commit -m 'Initial Commit'
git push -u origin main
Configure the production server
Before we begin setting up Envoy and GitLab CI/CD, let’s quickly make sure the production server is ready for deployment. We have installed LEMP stack which stands for Linux, NGINX, MySQL, and PHP on our Ubuntu 16.04.
Create a new user
Let’s now create a new user that will be used to deploy our website and give it the needed permissions using Linux ACL:
# Create user deployer
sudo adduser deployer
# Give the read-write-execute permissions to deployer user for directory /var/www
sudo setfacl -R -m u:deployer:rwx /var/www
If you don’t have ACL installed on your Ubuntu server, use this command to install it:
sudo apt install acl
Add SSH key
Let’s suppose we want to deploy our app to the production server from a private repository on GitLab. First, we need to generate a new SSH key pair with no passphrase for the deployer user.
After that, we need to copy the private key, which will be used to connect to our server as the deployer user with SSH, to be able to automate our deployment process:
# As the deployer user on server
#
# Copy the content of public key to authorized_keys
cat ~/.ssh/id_rsa.pub >> ~/.ssh/authorized_keys
# Copy the private key text block
cat ~/.ssh/id_rsa
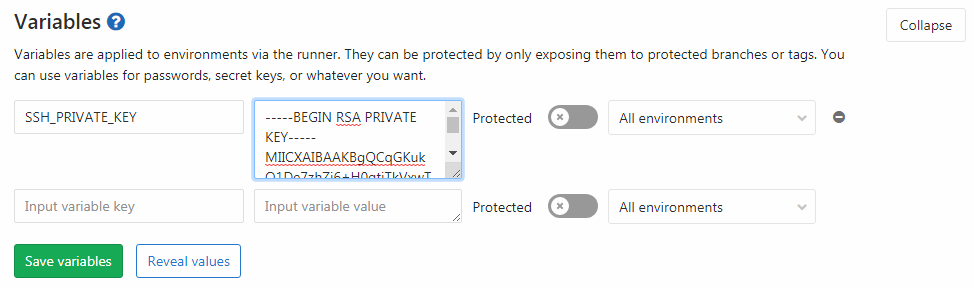
Now, let’s add it to your GitLab project as a CI/CD variable.
Project CI/CD variables are user-defined variables and are stored out of .gitlab-ci.yml, for security purposes.
They can be added per project by navigating to the project’s Settings > CI/CD.
To the field KEY, add the name SSH_PRIVATE_KEY, and to the VALUE field, paste the private key you’ve copied earlier.
We’ll use this variable in the .gitlab-ci.yml later, to easily connect to our remote server as the deployer user without entering its password.
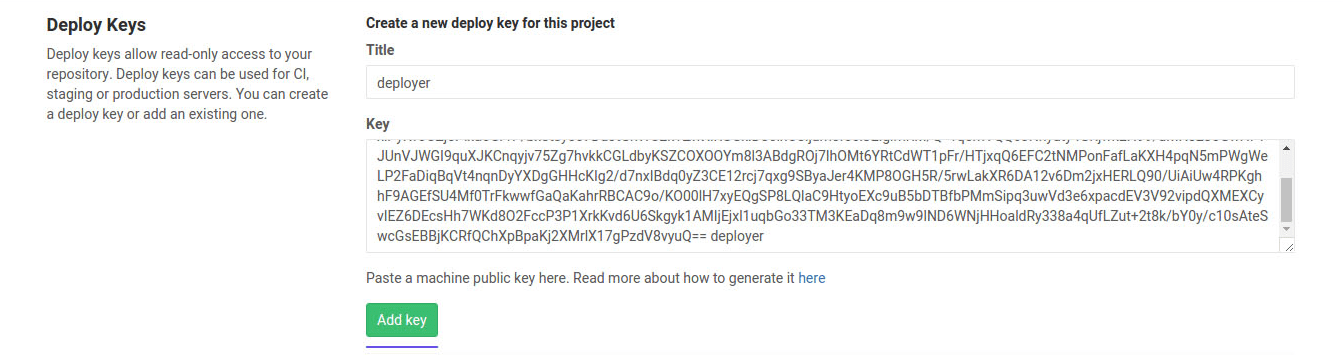
We also need to add the public key to Project > Settings > Repository as a deploy key, which gives us the ability to access our repository from the server through the SSH protocol.
# As the deployer user on the server
#
# Copy the public key
cat ~/.ssh/id_rsa.pub
To the field Title, add any name you want, and paste the public key into the Key field.
Now, let’s clone our repository on the server just to make sure the deployer user has access to the repository.
# As the deployer user on server
#
git clone git@gitlab.example.com:<USERNAME>/laravel-sample.git
Answer yes if asked Are you sure you want to continue connecting (yes/no)?.
It adds GitLab.com to the known hosts.
Configuring NGINX
Now, let’s make sure our web server configuration points to the current/public rather than public.
Open the default NGINX server block configuration file by typing:
sudo nano /etc/nginx/sites-available/default
The configuration should be like this.
server {
    root /var/www/app/current/public;
    server_name example.com;
    # Rest of the configuration
}
You may replace the app’s name in /var/www/app/current/public with the folder name of your application.
Setting up Envoy
So we have our Laravel app ready for production. The next thing is to use Envoy to perform the deploy.
To use Envoy, we should first install it on our local machine using the given instructions by Laravel.
How Envoy works
The pros of Envoy is that it doesn’t require Blade engine, it just uses Blade syntax to define tasks.
To start, we create an Envoy.blade.php in the root of our app with a simple task to test Envoy.
@servers(['web' => 'remote_username@remote_host'])

@task('list', ['on' => 'web'])
    ls -l
@endtask
As you may expect, we have an array within @servers directive at the top of the file, which contains a key named web with a value of the server’s address (for example, deployer@192.168.1.1).
Then within our @task directive we define the bash commands that should be run on the server when the task is executed.
On the local machine use the run command to run Envoy tasks.
envoy run list
It should execute the list task we defined earlier, which connects to the server and lists directory contents.
Envoy is not a dependency of Laravel, therefore you can use it for any PHP application.
Zero-downtime deployment
Every time we deploy to the production server, Envoy downloads the latest release of our app from GitLab repository and replace it with preview’s release. Envoy does this without any downtime, so we don’t have to worry during the deployment while someone might be reviewing the site. Our deployment plan is to clone the latest release from GitLab repository, install the Composer dependencies and finally, activate the new release.
@setup directive
The first step of our deployment process is to define a set of variables within @setup directive.
You may change the app to your application’s name:
...

@setup
    $repository = 'git@gitlab.example.com:<USERNAME>/laravel-sample.git';
    $releases_dir = '/var/www/app/releases';
    $app_dir = '/var/www/app';
    $release = date('YmdHis');
    $new_release_dir = $releases_dir .'/'. $release;
@endsetup

...
-
$repositoryis the address of our repository -
$releases_dirdirectory is where we deploy the app -
$app_diris the actual location of the app that is live on the server -
$releasecontains a date, so every time that we deploy a new release of our app, we get a new folder with the current date as name -
$new_release_diris the full path of the new release which is used just to make the tasks cleaner
@story directive
The @story directive allows us define a list of tasks that can be run as a single task.
Here we have three tasks called clone_repository, run_composer, update_symlinks. These variables are usable to making our task’s codes more cleaner:
...

@story('deploy')
    clone_repository
    run_composer
    update_symlinks
@endstory

...
Let’s create these three tasks one by one.
Clone the repository
The first task will create the releases directory (if it doesn’t exist), and then clone the main branch of the repository (by default) into the new release directory, given by the $new_release_dir variable.
The releases directory will hold all our deployments:
...

@task('clone_repository')
    echo 'Cloning repository'
    [ -d {{ $releases_dir }} ] || mkdir {{ $releases_dir }}
    git clone --depth 1 {{ $repository }} {{ $new_release_dir }}
    cd {{ $new_release_dir }}
    git reset --hard {{ $commit }}
@endtask

...
While our project grows, its Git history will be very long over time.
Since we are creating a directory per release, it might not be necessary to have the history of the project downloaded for each release.
The --depth 1 option is a great solution which saves systems time and disk space as well.
Installing dependencies with Composer
This task goes to the new release directory and runs Composer to install the application dependencies:
...

@task('run_composer')
    echo "Starting deployment ({{ $release }})"
    cd {{ $new_release_dir }}
    composer install --prefer-dist --no-scripts -q -o
@endtask

...
Activate new release
Next thing to do after preparing the requirements of our new release, is to remove the storage directory from it and to create two symbolic links to point the application’s storage directory and .env file to the new release.
Then, we need to create another symbolic link to the new release with the name of current placed in the app directory.
The current symbolic link always points to the latest release of our app:
...

@task('update_symlinks')
    echo "Linking storage directory"
    rm -rf {{ $new_release_dir }}/storage
    ln -nfs {{ $app_dir }}/storage {{ $new_release_dir }}/storage

    echo 'Linking .env file'
    ln -nfs {{ $app_dir }}/.env {{ $new_release_dir }}/.env

    echo 'Linking current release'
    ln -nfs {{ $new_release_dir }} {{ $app_dir }}/current
@endtask
As you see, we use -nfs as an option for ln command, which says that the storage, .env and current no longer points to the preview’s release and will point them to the new release by force (f from -nfs means force), which is the case when we are doing multiple deployments.
Full script
The script is ready, but make sure to change the deployer@192.168.1.1 to your server and also change /var/www/app with the directory you want to deploy your app.
At the end, our Envoy.blade.php file will look like this:
@servers(['web' => 'deployer@192.168.1.1'])

@setup
    $repository = 'git@gitlab.example.com:<USERNAME>/laravel-sample.git';
    $releases_dir = '/var/www/app/releases';
    $app_dir = '/var/www/app';
    $release = date('YmdHis');
    $new_release_dir = $releases_dir .'/'. $release;
@endsetup

@story('deploy')
    clone_repository
    run_composer
    update_symlinks
@endstory

@task('clone_repository')
    echo 'Cloning repository'
    [ -d {{ $releases_dir }} ] || mkdir {{ $releases_dir }}
    git clone --depth 1 {{ $repository }} {{ $new_release_dir }}
    cd {{ $new_release_dir }}
    git reset --hard {{ $commit }}
@endtask

@task('run_composer')
    echo "Starting deployment ({{ $release }})"
    cd {{ $new_release_dir }}
    composer install --prefer-dist --no-scripts -q -o
@endtask

@task('update_symlinks')
    echo "Linking storage directory"
    rm -rf {{ $new_release_dir }}/storage
    ln -nfs {{ $app_dir }}/storage {{ $new_release_dir }}/storage

    echo 'Linking .env file'
    ln -nfs {{ $app_dir }}/.env {{ $new_release_dir }}/.env

    echo 'Linking current release'
    ln -nfs {{ $new_release_dir }} {{ $app_dir }}/current
@endtask
One more thing we should do before any deployment is to manually copy our application storage folder to the /var/www/app directory on the server for the first time.
You might want to create another Envoy task to do that for you.
We also create the .env file in the same path to set up our production environment variables for Laravel.
These are persistent data and will be shared to every new release.
Now, we would need to deploy our app by running envoy run deploy, but it won’t be necessary since GitLab can handle that for us with CI’s environments, which will be described later in this tutorial.
Now it’s time to commit Envoy.blade.php and push it to the main branch.
To keep things simple, we commit directly to main, without using feature branches, since collaboration is beyond the scope of this tutorial.
In a real world project, teams may use Issue Tracker and merge requests to move their code across branches:
git add Envoy.blade.php
git commit -m 'Add Envoy'
git push origin main
Continuous Integration with GitLab
We have our app ready on GitLab, and we also can deploy it manually. But let’s take a step forward to do it automatically with Continuous Delivery method. We need to check every commit with a set of automated tests to become aware of issues at the earliest, and then, we can deploy to the target environment if we are happy with the result of the tests.
GitLab CI/CD allows us to use Docker engine to handle the process of testing and deploying our app. In case you’re not familiar with Docker, refer to Set up automated builds.
To be able to build, test, and deploy our app with GitLab CI/CD, we need to prepare our work environment. To do that, we’ll use a Docker image which has the minimum requirements that a Laravel app needs to run. There are other ways to do that as well, but they may lead our builds run slowly, which is not what we want when there are faster options to use.
Create a Container Image
Let’s create a Dockerfile in the root directory of our app with the following content:
# Set the base image for subsequent instructions
FROM php:7.4

# Update packages
RUN apt-get update

# Install PHP and composer dependencies
RUN apt-get install -qq git curl libmcrypt-dev libjpeg-dev libpng-dev libfreetype6-dev libbz2-dev

# Clear out the local repository of retrieved package files
RUN apt-get clean

# Install needed extensions
# Here you can install any other extension that you need during the test and deployment process
RUN docker-php-ext-install mcrypt pdo_mysql zip

# Install Composer
RUN curl --silent --show-error "https://getcomposer.org/installer" | php -- --install-dir=/usr/local/bin --filename=composer

# Install Laravel Envoy
RUN composer global require "laravel/envoy=~1.0"
We added the official PHP 7.4 Docker image, which consist of a minimum installation of Debian buster with PHP pre-installed, and works perfectly for our use case.
We used docker-php-ext-install (provided by the official PHP Docker image) to install the PHP extensions we need.
Setting Up GitLab container registry
Now that we have our Dockerfile let’s build and push it to our GitLab container registry.
The registry is the place to store and tag images for later use. Developers may want to maintain their own registry for private, company images, or for throw-away images used only in testing. Using GitLab container registry means you don’t need to set up and administer yet another service or use a public registry.
In your GitLab project repository, go to the Registry tab.
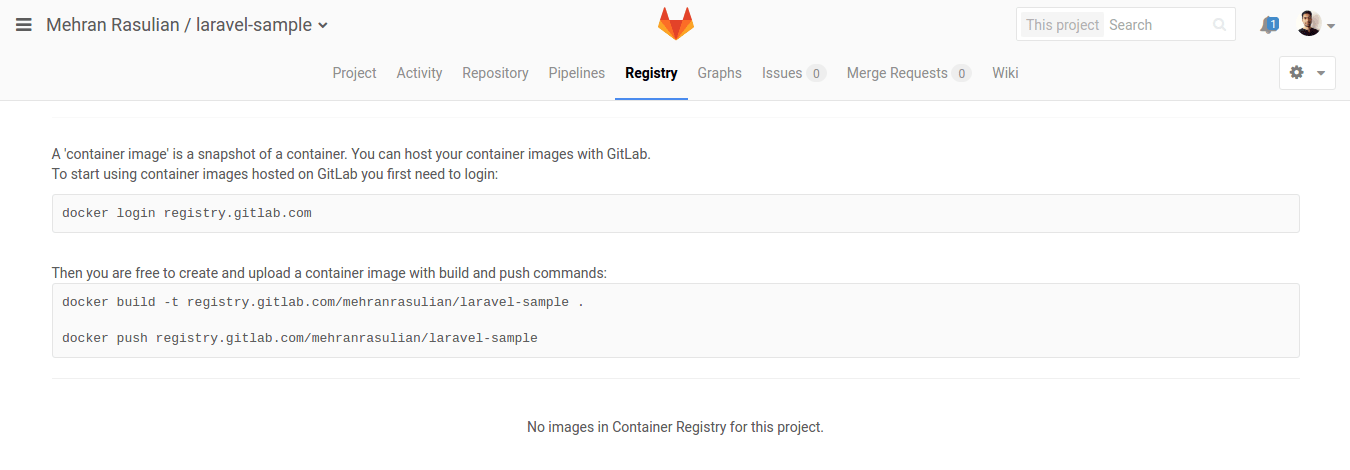
You may need to enable the container registry for your project to see this tab. You’ll find it under your project’s Settings > General > Visibility, project features, permissions.
To start using container registry on our machine, we first need to sign in to the GitLab registry using our GitLab username and password. Make sure you have Docker installed on our machine, then run the following commands:
docker login registry.gitlab.com
Then we can build and push our image to GitLab:
docker build -t registry.gitlab.com/<USERNAME>/laravel-sample .

docker push registry.gitlab.com/<USERNAME>/laravel-sample
Congratulations! You just pushed the first Docker image to the GitLab Registry, and if you refresh the page you should be able to see it:
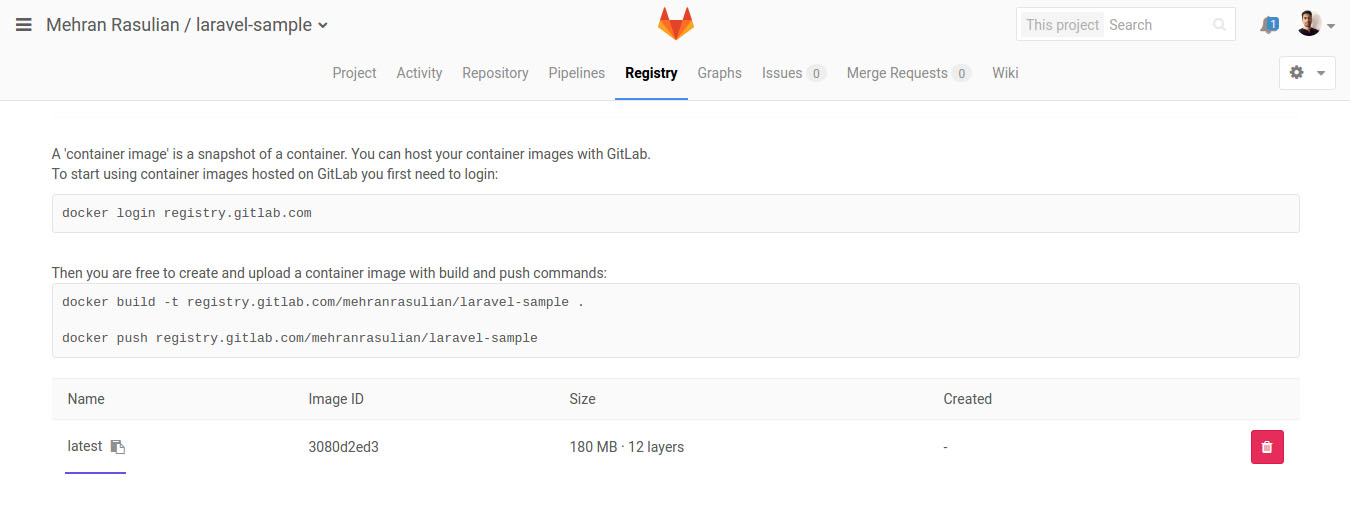
You can also use GitLab CI/CD to build and push your Docker images, rather than doing that on your machine.
We’ll use this image further down in the .gitlab-ci.yml configuration file to handle the process of testing and deploying our app.
Let’s commit the Dockerfile file.
git add Dockerfile
git commit -m 'Add Dockerfile'
git push origin main
Setting up GitLab CI/CD
In order to build and test our app with GitLab CI/CD, we need a file called .gitlab-ci.yml in our repository’s root. It is similar to Circle CI and Travis CI, but built-in GitLab.
Our .gitlab-ci.yml file will look like this:
default:
  image: registry.gitlab.com/<USERNAME>/laravel-sample:latest
  services:
    - mysql:5.7

variables:
  MYSQL_DATABASE: homestead
  MYSQL_ROOT_PASSWORD: secret
  DB_HOST: mysql
  DB_USERNAME: root

stages:
  - test
  - deploy

unit_test:
  stage: test
  script:
    - cp .env.example .env
    - composer install
    - php artisan key:generate
    - php artisan migrate
    - vendor/bin/phpunit

deploy_production:
  stage: deploy
  script:
    - 'which ssh-agent || ( apt-get update -y && apt-get install openssh-client -y )'
    - eval $(ssh-agent -s)
    - ssh-add <(echo "$SSH_PRIVATE_KEY")
    - mkdir -p ~/.ssh
    - '[[ -f /.dockerenv ]] && echo -e "Host *\n\tStrictHostKeyChecking no\n\n" > ~/.ssh/config'
    - ~/.composer/vendor/bin/envoy run deploy --commit="$CI_COMMIT_SHA"
  environment:
    name: production
    url: http://192.168.1.1
  when: manual
  rules:
    - if: $CI_COMMIT_BRANCH == "main"
That’s a lot to take in, isn’t it? Let’s run through it step by step.
Image and Services
Runners run the script defined by .gitlab-ci.yml.
The image keyword tells the runners which image to use.
The services keyword defines additional images that are linked to the main image.
Here we use the container image we created before as our main image and also use MySQL 5.7 as a service.
default:
  image: registry.gitlab.com/<USERNAME>/laravel-sample:latest
  services:
    - mysql:5.7

...
If you wish to test your app with different PHP versions and database management systems, you can define different image and services keywords for each test job.
CI/CD variables
GitLab CI/CD allows us to use CI/CD variables in our jobs. We defined MySQL as our database management system, which comes with a superuser root created by default.
So we should adjust the configuration of MySQL instance by defining MYSQL_DATABASE variable as our database name and MYSQL_ROOT_PASSWORD variable as the password of root.
Find out more about MySQL variables at the official MySQL Docker Image.
Also set the variables DB_HOST to mysql and DB_USERNAME to root, which are Laravel specific variables.
We define DB_HOST as mysql instead of 127.0.0.1, as we use MySQL Docker image as a service which is linked to the main Docker image.
variables:
  MYSQL_DATABASE: homestead
  MYSQL_ROOT_PASSWORD: secret
  DB_HOST: mysql
  DB_USERNAME: root
Unit Test as the first job
We defined the required shell scripts as an array of the script keyword to be executed when running unit_test job.
These scripts are some Artisan commands to prepare the Laravel, and, at the end of the script, we’ll run the tests by PHPUnit.
unit_test:
  script:
    # Install app dependencies
    - composer install
    # Set up .env
    - cp .env.example .env
    # Generate an environment key
    - php artisan key:generate
    # Run migrations
    - php artisan migrate
    # Run tests
    - vendor/bin/phpunit
Deploy to production
The job deploy_production will deploy the app to the production server.
To deploy our app with Envoy, we had to set up the $SSH_PRIVATE_KEY variable as an SSH private key.
If the SSH keys have added successfully, we can run Envoy.
As mentioned before, GitLab supports Continuous Delivery methods as well.
The environment keyword tells GitLab that this job deploys to the production environment.
The url keyword is used to generate a link to our application on the GitLab Environments page.
The rules:if keyword tells GitLab CI/CD that the job should be executed only when the pipeline is building the main branch.
Lastly, when: manual is used to turn the job from running automatically to a manual action.
deploy_production:
  script:
    # Add the private SSH key to the build environment
    - 'which ssh-agent || ( apt-get update -y && apt-get install openssh-client -y )'
    - eval $(ssh-agent -s)
    - ssh-add <(echo "$SSH_PRIVATE_KEY")
    - mkdir -p ~/.ssh
    - '[[ -f /.dockerenv ]] && echo -e "Host *\n\tStrictHostKeyChecking no\n\n" > ~/.ssh/config'
    # Run Envoy
    - ~/.composer/vendor/bin/envoy run deploy
  environment:
    name: production
    url: http://192.168.1.1
  when: manual
  rules:
    - if: $CI_COMMIT_BRANCH == "main"
You may also want to add another job for staging environment, to final test your application before deploying to production.
Turn on GitLab CI/CD
We have prepared everything we need to test and deploy our app with GitLab CI/CD.
To do that, commit and push .gitlab-ci.yml to the main branch. It will trigger a pipeline, which you can watch live under your project’s Pipelines.
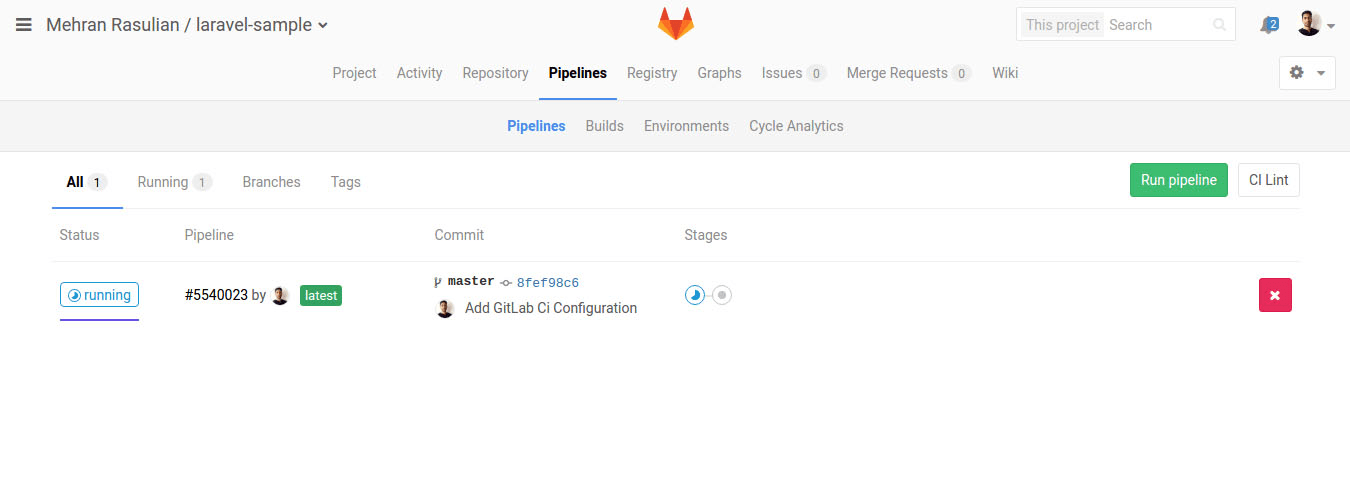
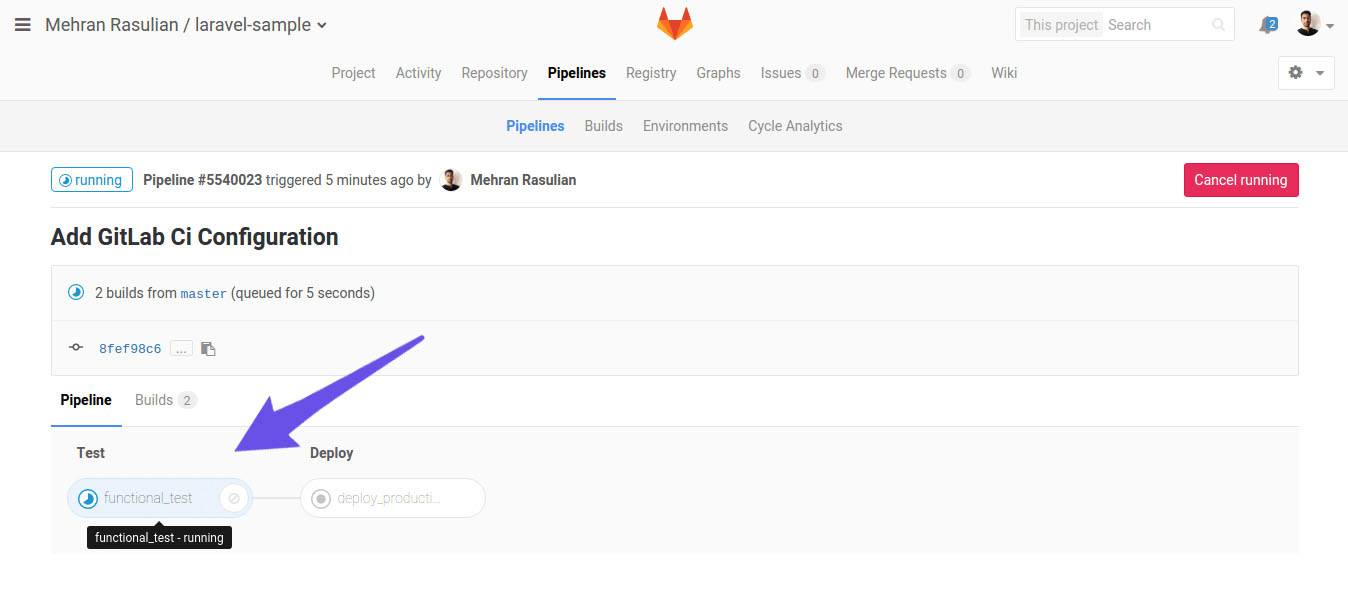
Here we see our Test and Deploy stages.
The Test stage has the unit_test build running.
Select it to see the runner’s output.
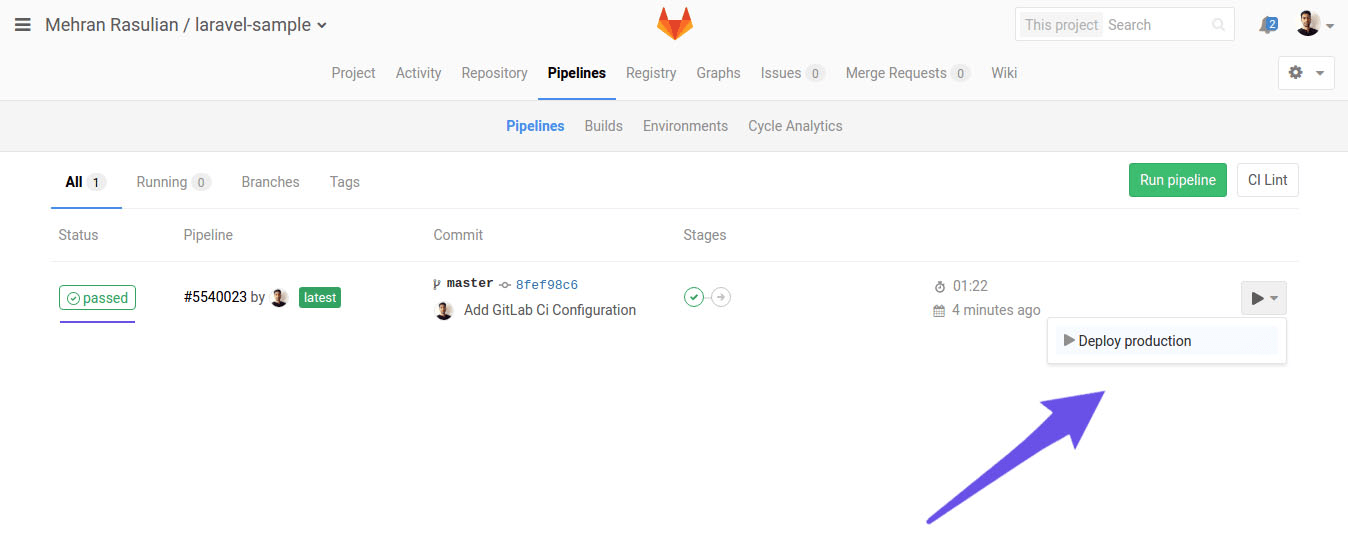
After our code passed through the pipeline successfully, we can deploy to our production server by selecting Run () on the right side.
After the deploy pipeline passes successfully, go to Pipelines > Environments.
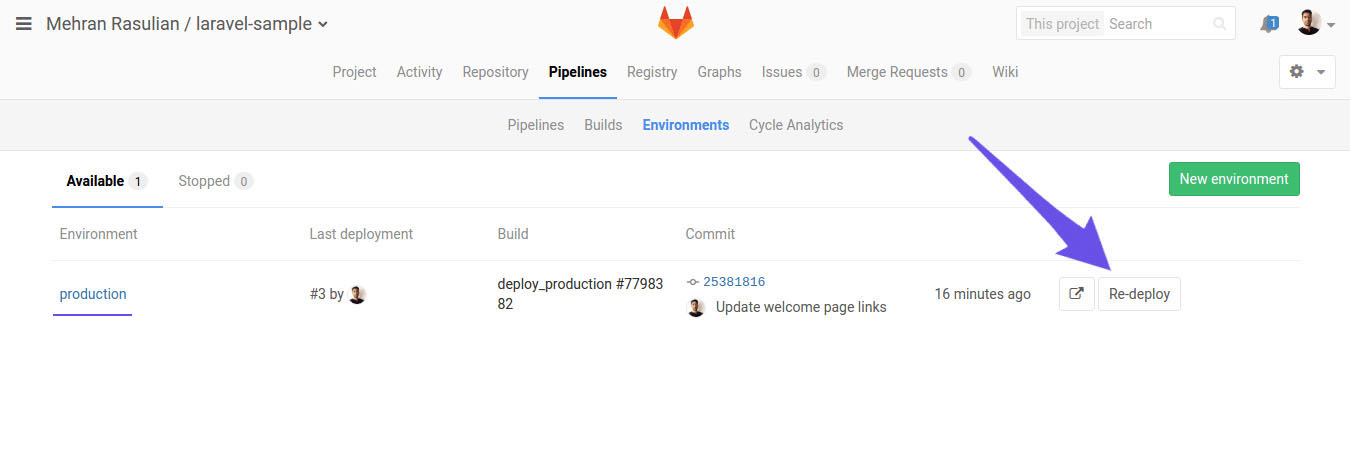
If something doesn’t work as expected, you can roll back to the latest working version of your app.
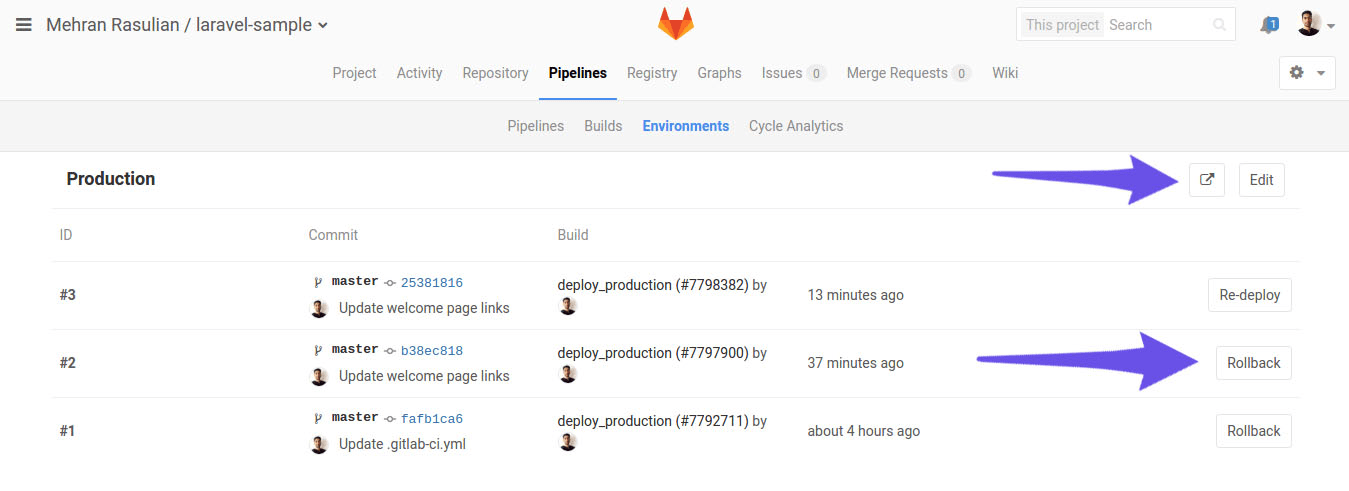
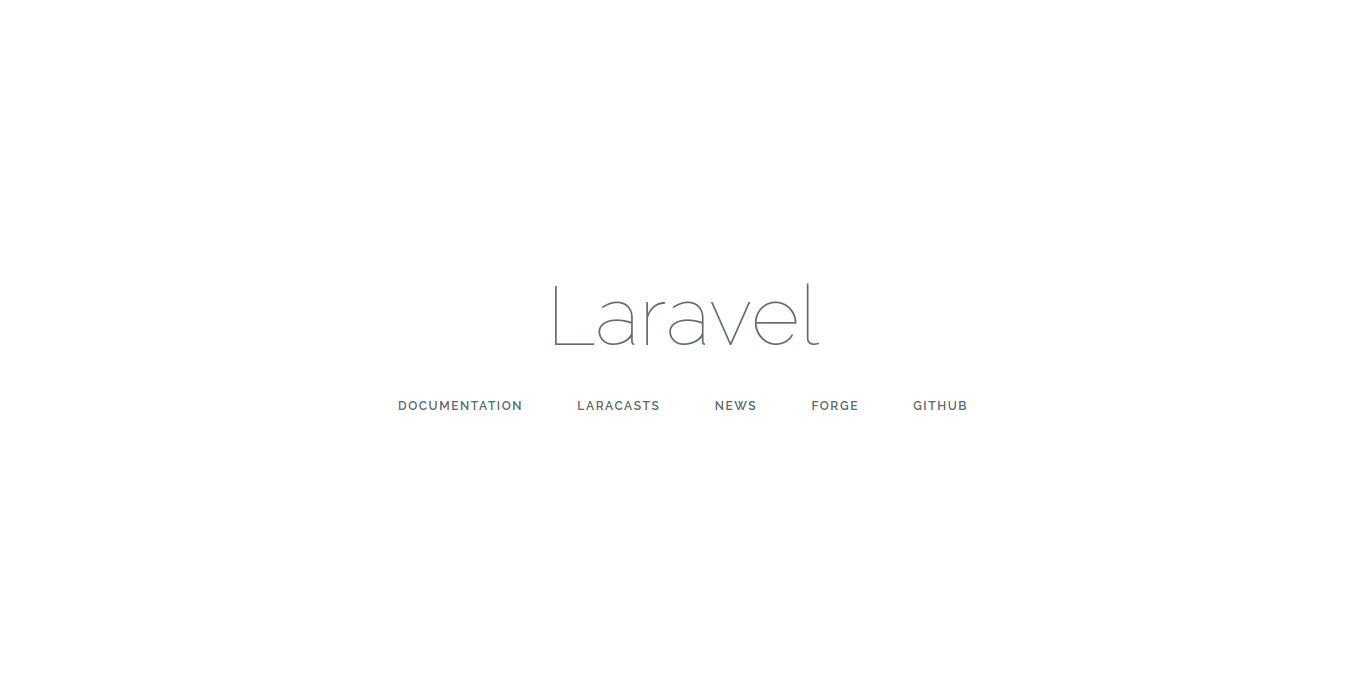
By selecting the external link icon specified on the right side, GitLab opens the production website. Our deployment successfully was done and we can see the application is live.
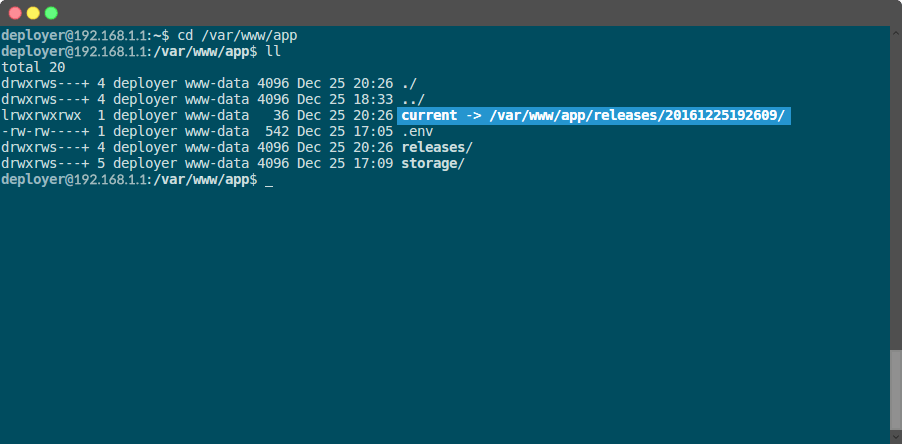
In the case that you’re interested to know how is the application directory structure on the production server after deployment, here are three directories named current, releases and storage.
As you know, the current directory is a symbolic link that points to the latest release.
The .env file consists of our Laravel environment variables.
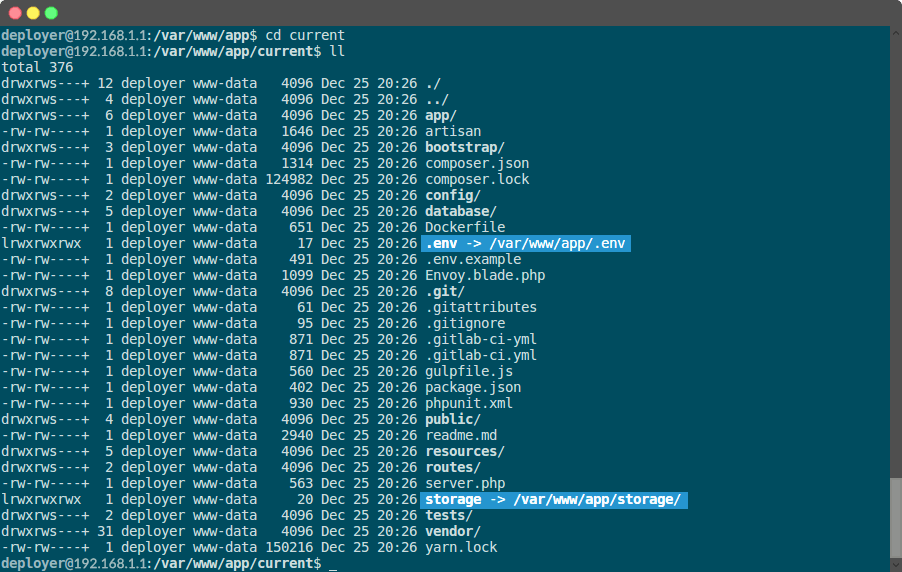
If you go to the current directory, you should see the application’s content.
As you see, the .env is pointing to the /var/www/app/.env file and also storage is pointing to the /var/www/app/storage/ directory.
Conclusion
We configured GitLab CI/CD to perform automated tests and used the method of Continuous Delivery to deploy to production a Laravel application with Envoy, directly from the codebase.
Envoy also was a great match to help us deploy the application without writing our custom bash script and doing Linux magics.