UI elements and navigation paths
References to UI in the documentation must:
- Use shortcodes to flag the text as UI text.
- Match the UI text itself exactly, including capitalization.
The only exception is UI text from an external tool that’s all uppercase (for example,
RECENT FLOWS). In this case, use sentence case.
UI elements include:
- Buttons
- Checkboxes
- Settings
- Menus
- Pages
- Tabs
If you think the user interface text contains style mistakes, create an issue or an MR to propose a change to the user interface text.
Mark UI text
The ui and external-ui shortcodes flag text as a UI element. Both render as bold on
docs.gitlab.com and in GitLab /help.
To mark a UI element, use one of the shortcodes:
- For GitLab, use
ui:- Copy the string from the
locale/gitlab.potfile. If the string has a namespace, include it. - If the string does not exist in
gitlab.pot, either the documentation and UI are out of sync or the UI text is hardcoded. Find the correct string and update the documentation, or use bold for hardcoded strings. - If the string ends in an ellipsis (
...or…), do not include the ellipsis in the shortcode.
- Copy the string from the
- For a non-GitLab product, use
external-ui. Match the other product’s UI string as closely as you can.
The following example includes a hardcoded string:
1. In the left sidebar, select {{< ui text="Settings" >}} > {{< ui text="Integrations" >}}.
1. Select the {{< ui text="Active" >}} checkbox.
1. Select **Jenkins**.
External UI example:
1. On your Jenkins instance, select {{< external-ui text="New Item" >}}.Example with namespaces:
1. In the right sidebar, in the {{< ui text="WorkItem|Iteration" >}} section, select {{< ui text="Edit" >}}.A CI/CD job checks every ui string against locale/gitlab.pot. The job fails when
a documented UI string is not found in the gitlab.pot file.
The job ignores external-ui strings.
Namespaces
If a UI text string has a namespace, you must include it in the shortcode.
Some strings occur multiple times in the gitlab.pot file but with different namespaces,
or no namespace. Check if there are multiple namespaces and use the one that matches
the area of the UI mentioned in the documentation.
The namespace does not display when the page renders. For example:
gitlab.potfile:msgid "Job|Cancel"- Shortcode:
{{< ui text="Job|Cancel" >}} - Rendered: Cancel
Navigation
When documenting how to navigate the GitLab UI:
- Always use location, then action.
- From the Project visibility dropdown list (location), select Public (action).
- Be brief and specific. For example:
- Do: Select Save.
- Do not: Select Save for the changes to take effect.
- If a step must include a reason, start the step with it. This helps the user scan more quickly.
- Do: To view the changes, in the merge request, select the link.
- Do not: Select the link in the merge request to view the changes.
Names for UI elements
In the GitLab UI, use the following names:
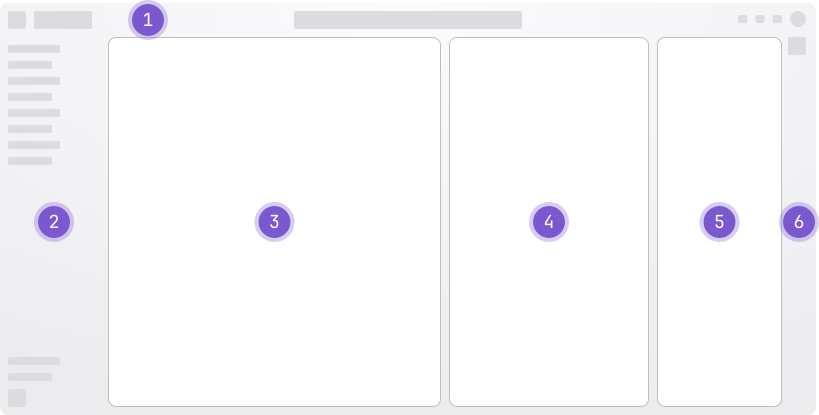
- Top bar
- Left sidebar: The navigation sidebar on the left of the user interface.
- Do not use the phrase
the Explore menuorthe Your work sidebar. Instead, usethe left sidebar.
- Do not use the phrase
- … panel: Based on the primary context. For example, if the context is a merge request, refer to it as the merge request panel.
- Details panel: Supports the primary context. Specific to the selected issue or epic.
- GitLab Duo panel
- GitLab Duo sidebar
The right sidebar is the navigation sidebar on the right of the user interface, specific to an open issue, merge request, or epic.
With the exception of GitLab Duo, use lowercase for all above terms.
Additional guidance for individual UI elements is in the word list.
How to write navigation task steps
To be consistent, use these examples to write navigation steps in a task topic. Although alternative steps might exist, including items pinned by default, use these steps instead.
To open project settings:
1. In the top bar, select {{< ui text="Search or go to" >}} and find your project.
1. In the left sidebar, select {{< ui text="Settings" >}} > {{< ui text="CI/CD" >}}.
1. Expand {{< ui text="General pipelines" >}}.
To open group settings:
1. In the top bar, select {{< ui text="Search or go to" >}} and find your group.
1. In the left sidebar, select {{< ui text="Settings" >}} > {{< ui text="CI/CD" >}}.
1. Expand {{< ui text="General pipelines" >}}.
To open settings for a top-level group:
1. In the top bar, select {{< ui text="Search or go to" >}} and find your group.
   This group must be at the top level.
1. In the left sidebar, select {{< ui text="Settings" >}} > {{< ui text="CI/CD" >}}.
1. Expand {{< ui text="General pipelines" >}}.
To open either project or group settings:
1. In the top bar, select {{< ui text="Search or go to" >}} and find your project or group.
1. In the left sidebar, select {{< ui text="Settings" >}} > {{< ui text="CI/CD" >}}.
1. Expand {{< ui text="General pipelines" >}}.
To create a project:
1. In the upper-right corner, select {{< ui text="Create new" >}} ({{< icon name="plus" >}}) and {{< ui text="New project/repository" >}}.To create a group:
1. In the upper-right corner, select {{< ui text="Create new" >}} ({{< icon name="plus" >}}) and {{< ui text="New group" >}}.To open the Admin area:
1. In the upper-right corner, select {{< ui text="Navigation|Admin" >}}.
1. In the left sidebar, select {{< ui text="Settings" >}} > {{< ui text="CI/CD" >}}.
To open the Your work menu item:
1. In the top bar, select {{< ui text="Search or go to" >}}.
1. Select {{< ui text="GlobalSearch|Your work" >}}.
To select your avatar:
1. In the upper-right corner, select your avatar.To save the selection in some dropdown lists:
1. Go to your issue.
1. In the right sidebar, in the {{< ui text="WorkItem|Iteration" >}} section, select {{< ui text="Edit" >}}.
1. From the dropdown list, select the iteration to associate this issue with.
1. Select any area outside the dropdown list.
To view all your projects:
1. In the top bar, select {{< ui text="Search or go to" >}}.
1. Select {{< ui text="Navigation|View all my projects" >}}.
To view all your groups:
1. In the top bar, select {{< ui text="Search or go to" >}}.
1. Select {{< ui text="Navigation|View all my groups" >}}.
Optional steps
If a step is optional, start the step with the word Optional followed by a period.
For example:
1. Optional. Enter a description for the job.Recommended steps
If a step is recommended, start the step with the word Recommended followed by a period.
For example:
1. Recommended. Enter a description for the job.Documenting keyboard shortcuts and commands
Write UI instructions instead of keyboard commands when both options exist. This guideline applies to GitLab and third-party applications, like VS Code.
Keyboard commands for GitLab are documented in GitLab keyboard shortcuts.
Documenting multiple fields in one step
If the UI text sufficiently explains the fields in a section, do not include a task step for every field. Instead, summarize multiple fields in a single task step.
Use the phrase Complete the fields.
For example:
1. In the top bar, select {{< ui text="Search or go to" >}} and find your project.
1. In the left sidebar, select {{< ui text="Settings" >}} > {{< ui text="Repository" >}}.
1. Expand {{< ui text="PushRule|Push rules" >}}.
1. Complete the fields.
If you are documenting multiple fields and only one field needs explanation, do it in the same step:
1. Expand {{< ui text="PushRule|Push rules" >}}.
1. Complete the fields. {{< ui text="PushRules|Branch name" >}} must be a regular expression.
To describe multiple fields, use unordered list items:
1. Select {{< ui text="PipelineSchedules|New schedule" >}}.
1. Complete the fields.
   - {{< ui text="PipelineSchedules|Interval Pattern" >}}: Select one of the preconfigured
     intervals, or enter a custom interval.
   - {{< ui text="Pipeline|Variables" >}}: Add any number of CI/CD variables to the schedule.