- Configure the chart
- Multiple external Gitaly
- Test that GitLab can connect to Gitaly
-
Migrate from Gitaly chart to external Gitaly
- Migrate with the repository storage moves API
-
Migrate with the backup/restore method
- Step 1: Get the current release revision of the GitLab Chart
- Step 2: Setup external Gitaly Service or Gitaly Cluster
- Step 3: Verify no Git changes can be made during migration
- Step 4: Backup all repositories
- Step 5: Configure Instance to use new Gitaly Service
- Step 6: Restore and validate repository backup
- Step 7: Final configuration and validation
- Rollback
- Related documentation
Configure the GitLab chart with an external Gitaly
This document intends to provide documentation on how to configure this Helm chart with an external Gitaly service.
If you don’t have Gitaly configured, for on-premise or deployment to VM, consider using our Linux package.
Configure the chart
Disable the gitaly chart and the Gitaly service it provides, and point the other services to the external service.
You need to set the following properties:
-
global.gitaly.enabled: Set tofalseto disable the included Gitaly chart. -
global.gitaly.external: This is an array of external Gitaly service(s). -
global.gitaly.authToken.secret: The name of the secret which contains the token for authentication. -
global.gitaly.authToken.key: The key within the secret, which contains the token content.
The external Gitaly services will make use of their own instances of GitLab Shell. Depending your implementation, you can configure those with the secrets from this chart, or you can configure this chart’s secrets with the content from a predefined source.
You may need to set the following properties:
-
global.shell.authToken.secret: The name of the secret which contains secret for GitLab Shell. -
global.shell.authToken.key: The key within the secret, which contains the secret content.
A complete example configuration, with two external services (external-gitaly.yml):
global:
  gitaly:
    enabled: false
    external:
      - name: default                   # required
        hostname: node1.git.example.com # required
        port: 8075                      # optional, default shown
      - name: praefect                  # required
        hostname: ha.git.example.com    # required
        port: 2305                      # Praefect uses port 2305
        tlsEnabled: false               # optional, overrides gitaly.tls.enabled
    authToken:
      secret: external-gitaly-token     # required
      key: token                        # optional, default shown
    tls:
      enabled: false                    # optional, default shown
Example installation using the above configuration file in conjunction other
configuration via gitlab.yml:
helm upgrade --install gitlab gitlab/gitlab  \
  -f gitlab.yml \
  -f external-gitaly.yml
Multiple external Gitaly
If your implementation uses multiple Gitaly nodes external to these charts, you can define multiple hosts as well. The syntax is slightly different, as to allow the complexity required.
An example values file is provided, which shows the
appropriate set of configuration. The content of this values file is not
interpreted correctly via --set arguments, so should be passed to Helm
with the -f / --values flag.
Connecting to external Gitaly over TLS
If your external Gitaly server listens over TLS port, you can make your GitLab instance communicate with it over TLS. To do this, you have to
-
Create a Kubernetes secret containing the certificate of the Gitaly server
kubectl create secret generic gitlab-gitaly-tls-certificate --from-file=gitaly-tls.crt=<path to certificate> -
Add the certificate of external Gitaly server to the list of custom Certificate Authorities In the values file, specify the following
global:
  certificates:
    customCAs:
      - secret: gitlab-gitaly-tls-certificate
or pass it to the
helm upgradecommand using--set--set global.certificates.customCAs[0].secret=gitlab-gitaly-tls-certificate -
To enable TLS for all Gitaly instances, set
global.gitaly.tls.enabled: true.global: gitaly: tls: enabled: trueTo enable for instances individually, set
tlsEnabled: truefor that entry.global: gitaly: external: - name: default hostname: node1.git.example.com tlsEnabled: true
customCAs to avoid
collision since all keys within the secrets will be mounted. You do not
need to provide the key for the certificate, as this is the client side.Test that GitLab can connect to Gitaly
To check that GitLab can connect to the external Gitaly server:
kubectl exec -it <toolbox-pod> -- gitlab-rake gitlab:gitaly:check
If you are using Gitaly with TLS, you can also check if GitLab Chart trusts the Gitaly certificate:
kubectl exec -it <toolbox-pod> -- echo | /usr/bin/openssl s_client -connect <gitaly-host>:<gitaly-port>
Migrate from Gitaly chart to external Gitaly
If you are using the Gitaly Chart to provide the Gitaly service and you need to migrate all of your repositories to an external Gitaly service, this can be done with one of the following methods:
- Migrate with the repository storage moves API (recommended).
- Migrate with the backup/restore method.
Migrate with the repository storage moves API
This method:
- Uses the repository storage moves API to migrate repositories from the Gitaly chart to the external Gitaly service.
- Can be performed with zero downtime.
- Requires that the external Gitaly service resides within the same VPC/zone as the Gitaly pods.
- Has not been tested with the Praefect chart and is not supported.
Step 1: Set up external Gitaly Service or Gitaly Cluster
Set up an external Gitaly or external Gitaly Cluster. You must provide the Gitaly token and GitLab Shell secret from your Chart installation as part of those steps:
# Get the GitLab Shell secret
kubectl get secret <release>-gitlab-shell-secret -ojsonpath='{.data.secret}' | base64 -d

# Get the Gitaly token
kubectl get secret <release>-gitaly-secret -ojsonpath='{.data.token}' | base64 -d
- The Gitaly token extracted here should be used for the
AUTH_TOKENvalue. - The GitLab Shell secret extracted here should be used for the
shellsecretvalue.
- The Gitaly token extracted here should be used for the
PRAEFECT_EXTERNAL_TOKEN. - The GitLab Shell secret extracted here should be used for the
GITLAB_SHELL_SECRET_TOKEN.
Lastly, ensure that the firewall for the external Gitaly service allows traffic on the configured Gitaly port for your Kubernetes pod IP range.
Step 2: Configure Instance to use new Gitaly Service
-
Configure GitLab to use the external Gitaly. If there are any Gitaly references in your main
gitlab.ymlconfiguration file, remove those and create a newmixed-gitaly.ymlfile with the following content.If you have previously defined additional Gitaly storages, you need to ensure a matching Gitaly storage with the same name is specified in the new configuration, otherwise the restore operation fails.
Refer to the connecting to external Gitaly over TLS section if you are configuring TLS:
Gitalyglobal: gitaly: internal: names: - default external: - name: ext-gitaly # required hostname: node1.git.example.com # required port: 8075 # optional, default shown tlsEnabled: false # optional, overrides gitaly.tls.enabledGitaly Clusterglobal: gitaly: internal: names: - default external: - name: ext-gitaly-cluster # required hostname: ha.git.example.com # required port: 2305 # Praefect uses port 2305 tlsEnabled: false # optional, overrides gitaly.tls.enabled -
Apply the new configuration using the
gitlab.ymlandmixed-gitaly.ymlfiles:helm upgrade --install gitlab gitlab/gitlab \ -f gitlab.yml \ -f mixed-gitaly.yml -
On the Toolbox pod, confirm that GitLab can connect to the external Gitaly successfully:
kubectl exec <toolbox pod name> -it -- gitlab-rake gitlab:gitaly:check -
Ensure that the external Gitaly can connect back to your Chart install:
GitalyEnsure that the Gitaly service can perform callbacks to the GitLab API successfully:
sudo /opt/gitlab/embedded/bin/gitaly check /var/opt/gitlab/gitaly/config.tomlGitaly ClusterOn all Praefect nodes, ensure that the Praefect service can connect to the Gitaly nodes:
# Run on Praefect nodes
sudo /opt/gitlab/embedded/bin/praefect -config /var/opt/gitlab/praefect/config.toml dial-nodes
On all Gitaly nodes, ensure that the Gitaly service can perform callbacks to the GitLab API successfully:
# Run on Gitaly nodes
sudo /opt/gitlab/embedded/bin/gitaly check /var/opt/gitlab/gitaly/config.toml
Step 3: Get the Gitaly pod IP and hostnames
For the repository storage moves API to succeed, the external Gitaly service needs to be able to connect back to the Gitaly pods using the pod service hostname. In order for the pod service hostnames to be resolvable, we need to add the hostnames to the hosts file on each external Gitaly service running the Gitaly process.
-
Fetch a list of Gitaly pods and their respective internal IP addresses/hostnames:
kubectl get pods -l app=gitaly -o jsonpath='{range .items[*]}{.status.podIP}{"\t"}{.spec.hostname}{"."}{.spec.subdomain}{"."}{.metadata.namespace}{".svc\n"}{end}' - Add the output from the last step to the
/etc/hostsfile on each external Gitaly service running the Gitaly process. -
Confirm that the Gitaly pod hostnames can be pinged from each external Gitaly service running the Gitaly process:
ping <gitaly pod hostname>
After connectivity is confirmed, we can proceed to scheduling the repository storage move.
Step 4: Schedule the repository storage move
Schedule the move by following the steps indicated in moving repositories.
Step 5: Final configuration and validation
-
If you have multiple Gitaly storages, configure where new repositories are stored.
-
Consider generating a consolidated
gitlab.ymlfor the future that includes the external Gitaly configuration:helm get values <RELEASE_NAME> -o yaml > gitlab.yml -
Disable the internal Gitaly subchart in the
gitlab.ymlfile, and point the newdefaultrepository storage to the external Gitaly service. GitLab requires a default repository storage:Gitalyglobal: gitaly: enabled: false # Disable the internal Gitaly subchart external: - name: ext-gitaly # required hostname: node1.git.example.com # required port: 8075 # optional, default shown tlsEnabled: false # optional, overrides gitaly.tls.enabled - name: default # Add the default repository storage, use the same settings as ext-gitaly hostname: node1.git.example.com port: 8075 tlsEnabled: falseGitaly Clusterglobal: gitaly: enabled: false # Disable the internal Gitaly subchart external: - name: ext-gitaly-cluster # required hostname: ha.git.example.com # required port: 2305 # Praefect uses port 2305 tlsEnabled: false # optional, overrides gitaly.tls.enabled - name: default # Add the default repository storage, use the same settings as ext-gitaly-cluster hostname: ha.git.example.com port: 2305 tlsEnabled: false -
Apply the new configuration:
helm upgrade --install gitlab gitlab/gitlab \ -f gitlab.yml -
Optional. Remove the changes made to each external Gitaly
/etc/hostsfile after following the get the Gitaly pod IP and hostnames step. -
After you have confirmed everything is working as expected, you can delete the Gitaly PVC:
Do not delete the Gitaly PVC until you have double checked that everything is working as expected.kubectl delete pvc repo-data-<release>-gitaly-0
Migrate with the backup/restore method
This method:
- Backs up your repositories from the Gitaly chart PersistentVolumeClaim (PVC) and then restore them to the external Gitaly service.
- Does incur downtime to all users.
- Has not been tested with the Praefect chart and is not supported.
Step 1: Get the current release revision of the GitLab Chart
In the unlikely event that something goes wrong during the migration, get the current release revision of the GitLab Chart. Copy the output and put it aside just in case we need to perform a rollback:
helm history <release> --max=1
Step 2: Setup external Gitaly Service or Gitaly Cluster
Set up an external Gitaly or external Gitaly Cluster. You must provide the Gitaly token and GitLab Shell secret from your Chart installation as part of those steps:
# Get the GitLab Shell secret
kubectl get secret <release>-gitlab-shell-secret -ojsonpath='{.data.secret}' | base64 -d

# Get the Gitaly token
kubectl get secret <release>-gitaly-secret -ojsonpath='{.data.token}' | base64 -d
- The Gitaly token extracted here should be used for the
AUTH_TOKENvalue. - The GitLab Shell secret extracted here should be used for the
shellsecretvalue.
- The Gitaly token extracted here should be used for the
PRAEFECT_EXTERNAL_TOKEN. - The GitLab Shell secret extracted here should be used for the
GITLAB_SHELL_SECRET_TOKEN.
Step 3: Verify no Git changes can be made during migration
To ensure the data integrity of the migration, prevent any changes from being made to your Git repositories in the following steps:
1. Enable Maintenance Mode
If you are using GitLab Enterprise Edition, enable maintenance mode either through the UI, API or the Rails console:
kubectl exec <toolbox pod name> -it -- gitlab-rails runner 'Gitlab::CurrentSettings.update!(maintenance_mode: true)'
2. Scale down Runner pods
If you are using GitLab Community Edition, you must scale down any GitLab Runner pods that are running in the cluster. This prevents the Runners from connecting to GitLab to process CI/CD jobs.
If you are using GitLab Enterprise Edition, this step is optional because maintenance mode prevents Runners in the cluster from connecting to GitLab.
# Make note of the current number of replicas for Runners so we can scale up to this number later
kubectl get deploy -lapp=gitlab-gitlab-runner,release=<release> -o jsonpath='{.items[].spec.replicas}{"\n"}'

# Scale down the Runners pods to zero
kubectl scale deploy -lapp=gitlab-gitlab-runner,release=<release> --replicas=0
3. Confirm no CI jobs are running
In the Admin Area, go to CI/CD > Jobs. This page shows you all jobs, but confirm that there are no jobs with the Running status. You need to wait for the jobs to complete before proceeding to the next step.
4. Disable Sidekiq cron jobs
To prevent Sidekiq jobs from being scheduled and executed during the migration, disable all Sidekiq cron jobs:
kubectl exec <toolbox pod name> -it -- gitlab-rails runner 'Sidekiq::Cron::Job.all.map(&:disable!)'
5. Confirm no background jobs are running
We need to wait for any enqueued or in progress jobs to complete before proceeding to the next step.
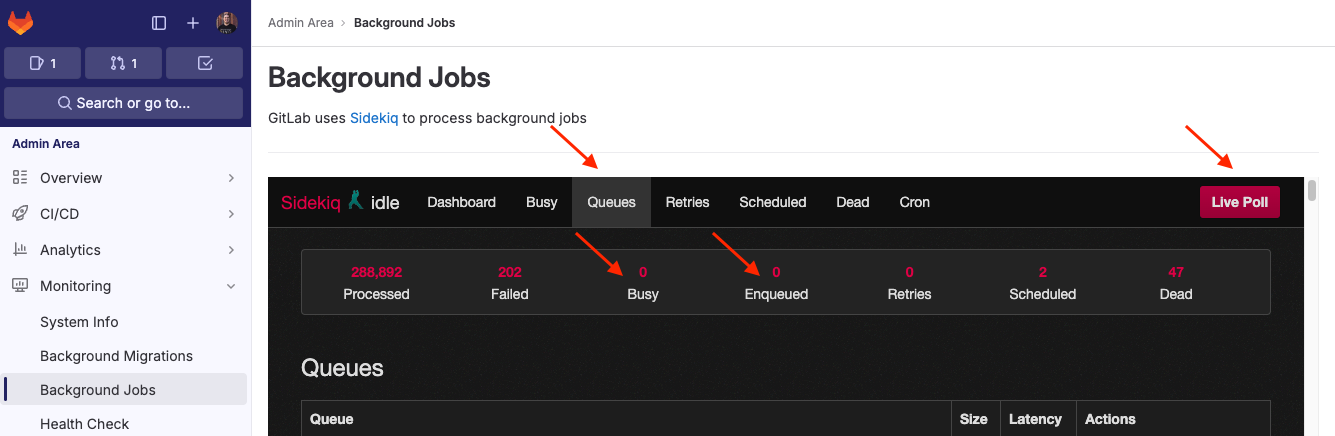
- In the Admin Area, go to Monitoring and select Background Jobs.
- Under the Sidekiq dashboard, select Queues and then Live Poll.
-
Wait for Busy and Enqueued to drop to 0.
6. Scale down Sidekiq and Webservice pods
Scale down the Sidekiq and Webservice pods to ensure that a consistent backup is taken. Both services are scaled up at a later stage:
- The Sidekiq pods are scaled back up during the restore step
- The Webservice pods are scaled back up after switching to the external Gitaly service to test connectivity
# Make note of the current number of replicas for Sidekiq and Webservice so we can scale up to this number later
kubectl get deploy -lapp=sidekiq,release=<release> -o jsonpath='{.items[].spec.replicas}{"\n"}'
kubectl get deploy -lapp=webservice,release=<release> -o jsonpath='{.items[].spec.replicas}{"\n"}'

# Scale down the Sidekiq and Webservice pods to zero
kubectl scale deploy -lapp=sidekiq,release=<release> --replicas=0
kubectl scale deploy -lapp=webservice,release=<release> --replicas=0
7. Restrict external connections to the cluster
To prevent users and external GitLab Runners from making any changes to GitLab, we need to restrict all unnecessary connections to GitLab.
Once these steps are completed, GitLab is completely unavailable in the browser until the restore is completed.
In order to keep the cluster accessible to the new external Gitaly service during the migration, we must add the
IP address for the external Gitaly service to the nginx-ingress configuration as the only external exception.
-
Create a
ingress-only-allow-ext-gitaly.ymlfile with the following content:nginx-ingress: controller: service: loadBalancerSourceRanges: - "x.x.x.x/32"x.x.x.xshould be the IP address of the external Gitaly service. -
Apply the new configuration using both
gitlab.ymlandingress-only-allow-ext-gitaly.ymlfiles:helm upgrade <release> gitlab/gitlab \ -f gitlab.yml \ -f ingress-only-allow-ext-gitaly.yml
8. Create list of repository checksums
Prior to running the backup, check all GitLab repositories
and create a list of repository checksums. Pipe the output to a file so we can diff the checksums after the migration:
kubectl exec <toolbox pod name> -it -- gitlab-rake gitlab:git:checksum_projects > ~/checksums-before.txt
Step 4: Backup all repositories
Create a backup of your repositories only:
kubectl exec <toolbox pod name> -it -- backup-utility --skip artifacts,ci_secure_files,db,external_diffs,lfs,packages,pages,registry,terraform_state,uploads
Step 5: Configure Instance to use new Gitaly Service
-
Disable the Gitaly subchart and configure GitLab to use the external Gitaly. If there are any Gitaly references in your main
gitlab.ymlconfiguration file, remove those and create a newexternal-gitaly.ymlfile with the following content.If you have previously defined additional Gitaly storages, you need to ensure a matching Gitaly storage with the same name is specified in the new configuration, otherwise the restore operation fails.
Refer to the connecting to external Gitaly over TLS section if you are configuring TLS:
Gitalyglobal: gitaly: enabled: false external: - name: default # required hostname: node1.git.example.com # required port: 8075 # optional, default shown tlsEnabled: false # optional, overrides gitaly.tls.enabledGitaly Clusterglobal: gitaly: enabled: false external: - name: default # required hostname: ha.git.example.com # required port: 2305 # Praefect uses port 2305 tlsEnabled: false # optional, overrides gitaly.tls.enabled -
Apply the new configuration using the
gitlab.yml,ingress-only-allow-ext-gitaly.yml, andexternal-gitaly.ymlfiles:helm upgrade --install gitlab gitlab/gitlab \ -f gitlab.yml \ -f ingress-only-allow-ext-gitaly.yml \ -f external-gitaly.yml -
Scale up your Webservice pods to the original replica count if they aren’t running. This is required so we can test the GitLab to external Gitaly connection in the following steps.
kubectl scale deploy -lapp=webservice,release=<release> --replicas=<value> -
On the Toolbox pod, confirm that GitLab can connect to the external Gitaly successfully:
kubectl exec <toolbox pod name> -it -- gitlab-rake gitlab:gitaly:check -
Ensure that the external Gitaly can connect back to your Chart install:
GitalyEnsure that the Gitaly service can perform callbacks to the GitLab API successfully:
sudo /opt/gitlab/embedded/bin/gitaly check /var/opt/gitlab/gitaly/config.tomlGitaly ClusterOn all Praefect nodes, ensure that the Praefect service can connect to the Gitaly nodes:
# Run on Praefect nodes
sudo /opt/gitlab/embedded/bin/praefect -config /var/opt/gitlab/praefect/config.toml dial-nodes
On all Gitaly nodes, ensure that the Gitaly service can perform callbacks to the GitLab API successfully:
# Run on Gitaly nodes
sudo /opt/gitlab/embedded/bin/gitaly check /var/opt/gitlab/gitaly/config.toml
Step 6: Restore and validate repository backup
-
Restore the backup file created previously. As a result, the repositories are copied to the configured external Gitaly or Gitaly Cluster.
-
Check all GitLab repositories and create a list of repository checksums. Pipe the output to a file so we can
diffthe checksums in the next step:kubectl exec <toolbox pod name> -it -- gitlab-rake gitlab:git:checksum_projects > ~/checksums-after.txt -
Compare the repository checksums before and after the repository migration. If the checksums are identical, this command returns no output:
diff ~/checksums-before.txt ~/checksums-after.txtIf you observe a blank checksum changing to
0000000000000000000000000000000000000000in thediffoutput for a specific line, this is expected and can be safely ignored.
Step 7: Final configuration and validation
-
To allow external users and GitLab Runners to connect to GitLab again, apply the
gitlab.ymlandexternal-gitaly.ymlfiles. As we aren’t specifyingingress-only-allow-ext-gitaly.yml, it removes the IP restrictions:helm upgrade <release> gitlab/gitlab \ -f gitlab.yml \ -f external-gitaly.ymlConsider generating a consolidated
gitlab.ymlfor the future that includes the external Gitaly configuration:helm get values <release> gitlab/gitlab -o yaml > gitlab.yml -
If you are using GitLab Enterprise Edition, disable maintenance mode either through the UI, API or the Rails console:
kubectl exec <toolbox pod name> -it -- gitlab-rails runner 'Gitlab::CurrentSettings.update!(maintenance_mode: false)' -
If you have multiple Gitaly storages, configure where new repositories are stored.
-
Enable Sidekiq cron jobs:
kubectl exec <toolbox pod name> -it -- gitlab-rails runner 'Sidekiq::Cron::Job.all.map(&:enable!)' -
Scale up your Runner pods to the original replica count if they aren’t running:
kubectl scale deploy -lapp=gitlab-gitlab-runner,release=<release> --replicas=<value> -
After you have confirmed everything is working as expected, you can delete the Gitaly PVC:
Do not delete the Gitaly PVC until you have confirmed the checksums match as per step 6 and double checked that everything is working as expected.kubectl delete pvc repo-data-<release>-gitaly-0
Rollback
If you run into any problems, you can rollback the changes made so the Gitaly subchart is used again.
The original Gitaly PVC must exist to rollback successfully.
-
Rollback the GitLab Chart to the previous release using the revision number obtained in Step 1: Get the current release revision of the GitLab Chart:
helm rollback <release> <revision> -
Scale up your Webservice pods to the original replica count if they aren’t running:
kubectl scale deploy -lapp=webservice,release=<release> --replicas=<value> -
Scale up your Sidekiq pods to the original replica count if they aren’t running:
kubectl scale deploy -lapp=sidekiq,release=<release> --replicas=<value> -
Enable Sidekiq cron jobs if you previously disabled them:
kubectl exec <toolbox pod name> -it -- gitlab-rails runner 'Sidekiq::Cron::Job.all.map(&:enable!)' -
Scale up your Runner pods to the original replica count if they aren’t running:
kubectl scale deploy -lapp=gitlab-gitlab-runner,release=<release> --replicas=<value> -
If you are using GitLab Enterprise Edition, disable maintenance mode if it is enabled.