- Understand the conflict block
- Conflicts you can resolve in the user interface
- Methods of resolving conflicts
- Related topics
Merge conflicts
Merge conflicts happen when the two branches in a merge request (the source and target) each have different changes. You must decide which change to accept. In a merge request, Git compares the two versions of the files line by line. In most cases, GitLab can merge changes together. However, if two branches both change the same lines, GitLab blocks the merge, and you must choose which change you want to keep:
A merge request with conflicts cannot merge until you either:
- Create a merge commit.
- Resolve the conflict through a rebase.
GitLab resolves conflicts by creating a merge commit in the source branch, but does not merge it into the target branch. You can then review and test the merge commit. Verify it contains no unintended changes and doesn’t break your build.
Understand the conflict block
When Git detects a conflict that requires a decision on your part, it marks the beginning and end of the conflict block with conflict markers:
-
<<<<<<< HEADmarks the beginning of the conflict block. - Your changes are shown.
-
=======marks the end of your changes. - The latest changes in the target branch are shown.
-
>>>>>>>marks the end of the conflict.
When you resolve a conflict, you delete:
- The version of the conflicted lines you don’t want to keep.
- The three conflict markers: the beginning, the end, and the
=======line between the two versions.
Conflicts you can resolve in the user interface
If your merge conflict meets all of these conditions, you can resolve the merge conflict in the GitLab user interface:
- The file is text, not binary.
- The file is in a UTF-8 compatible encoding.
- The file does not already contain conflict markers.
- The file, with conflict markers added, is less than 200 KB in size.
- The file exists under the same path in both branches.
If any file in your merge request contains conflicts, but can’t meet all of these criteria, you must resolve the conflict manually.
Methods of resolving conflicts
GitLab shows conflicts available for resolution in the user interface, and you can also resolve conflicts locally through the command line:
- Interactive mode: UI method best for conflicts that only require you to select which version of a line to keep, without edits.
- Inline editor: UI method best for more complex conflicts that require you to edit lines and manually blend changes together.
- Command line: provides complete control over the most complex conflicts.
In interactive mode
To resolve less-complex conflicts from the GitLab user interface:
- On the left sidebar, select Search or go to and find your project.
- Select Code > Merge requests and find the merge request.
- Select Overview, and scroll to the merge request reports section.
-
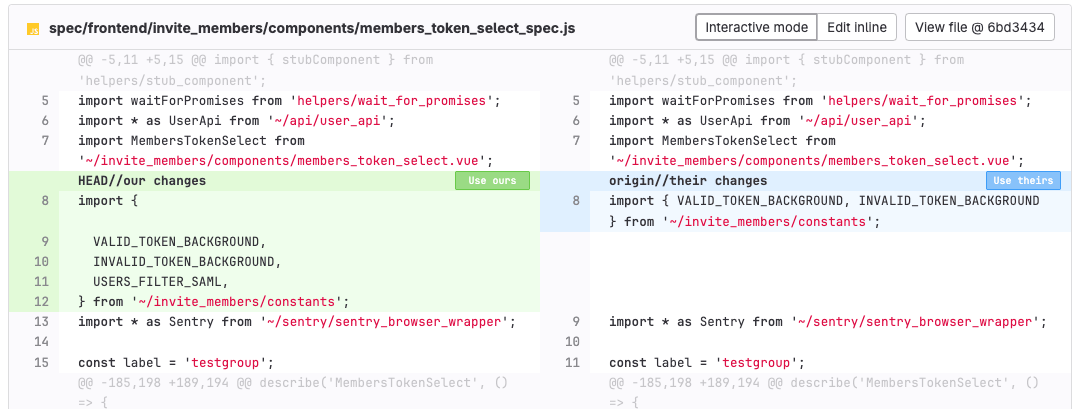
Find the merge conflicts message, and select Resolve conflicts. GitLab shows a list of files with merge conflicts. The lines that conflict are highlighted:
- For each conflict, select Use ours or Use theirs to mark the version of the conflicted lines you want to keep. This decision is known as “resolving the conflict.”
- When you’ve resolved all the conflicts, enter a Commit message.
- Select Commit to source branch.
Resolving conflicts merges the target branch of the merge request into the
source branch, using the version of the text you chose. If the source branch is
feature and the target branch is main, these actions are like running
git switch feature; git merge main locally.
In the inline editor
Some merge conflicts are more complex, and you must manually edit lines to resolve their conflicts. The merge conflict resolution editor helps you resolve these complex conflicts in the GitLab interface:
- On the left sidebar, select Search or go to and find your project.
- Select Code > Merge requests and find the merge request.
- Select Overview, and scroll to the merge request reports section.
- Find the merge conflicts message, and select Resolve conflicts. GitLab shows a list of files with merge conflicts.
- Find the file to edit manually, and scroll to the conflict block.
-
In the header for that file, select Edit inline to open the editor. In this example, the conflict block begins at line 1350 and ends at line 1356:
- After you resolve the conflict, enter a Commit message.
- Select Commit to source branch.
From the command line
While you can resolve most conflicts through the GitLab user interface, some are too complex. Complex conflicts are best fixed locally, from the command line, to give you the most control over each change.
Prerequisites:
- You must have permission to force push to branches.
-
Open the terminal and check out your feature branch. For example,
my-feature-branch:git switch my-feature-branch -
Rebase your branch against the target branch (here,
main) so Git prompts you with the conflicts:git fetch git rebase origin/main - Open the conflicting file in your preferred code editor.
- Find the conflict block.
- Edit the file:
- Choose which version (before or after
=======) you want to keep. - Delete the version you don’t want to keep.
- Delete the conflict markers.
- Choose which version (before or after
- Save the file.
- Repeat the process for each file that contains conflicts.
-
Stage your changes in Git:
git add . -
Commit your changes:
git commit -m "Fix merge conflicts" -
Continue the rebase:
git rebase --continueUp to this point, you can rungit rebase --abortto stop the process. Git aborts the rebase and rolls back the branch to the state you had before runninggit rebase. After you rungit rebase --continue, you cannot abort the rebase. - Force-push the changes to your remote branch.


