Community programs
GitLab provides the following community program subscriptions.
GitLab for Education
For qualifying non-profit educational institutions, the GitLab for Education Program provides GitLab Ultimate, plus 50,000 compute minutes per month. The subscription granted under GitLab for Education can only be used for instructional use or non-commercial academic research. For more information—including instructions for applying to the program and renewing program membership—see the GitLab for Education Program page and the GitLab handbook.
GitLab for Open Source
For qualifying open source projects, the GitLab for Open Source Program provides GitLab Ultimate, plus 50,000 compute minutes per month. For more information—including instructions for applying to the program and renewing program membership—see the GitLab for Open Source Program page and the GitLab handbook.
Meeting GitLab for Open Source Program requirements
To meet GitLab for Open Source Program requirements, first add an OSI-approved open source license to all projects in your namespace.
To add a license to a project:
- On the left sidebar, select Search or go to and find your project.
- On the overview page, select Add LICENSE. If the license you want is not available as a license template, manually copy the entire, unaltered text of your chosen license into the
LICENSEfile. GitLab defaults to All rights reserved if users do not perform this action.
Applicants must add the correct license to each project in their respective groups or namespaces. When you’re sure you’re using OSI-approved licenses for your projects, you can take your screenshots.
Verification for Open Source Program
Next, take screenshots of your project to confirm that project’s eligibility. You must upload three screenshots:
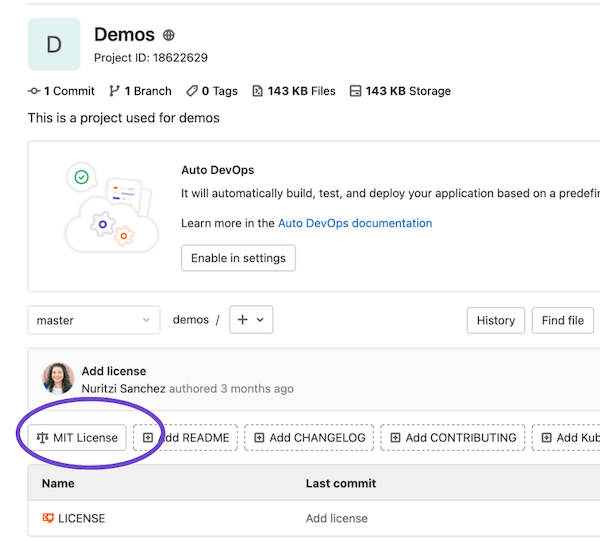
Screenshot 1: License overview
- On the left sidebar, select Search or go to and find your project.
- Select your project avatar. If you haven’t specified an avatar for your project, the avatar displays as a single letter.
- Take a screenshot of the project overview that clearly displays the license you’ve chosen for your project.
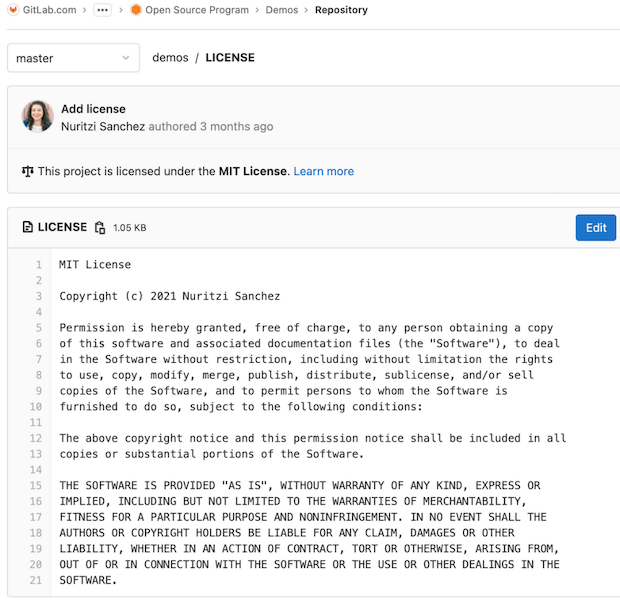
Screenshot 2: License contents
- On the left sidebar, select Search or go to and find your project.
- Select Code > Repository and locate the project’s
LICENSEfile. - Take a screenshot of the contents of the file. Make sure the screenshot includes the title of the license.
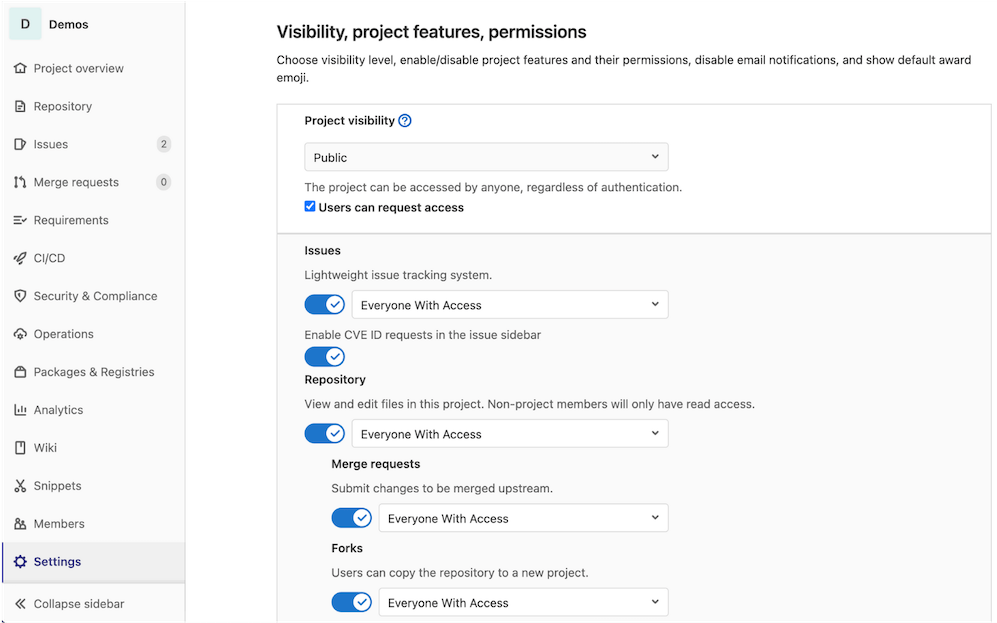
Screenshot 3: Publicly visible settings
To be eligible for the GitLab Open Source Program, projects must be publicly visible. To check your project’s public visibility settings:
- On the left sidebar, select Search or go to and find your project.
- Select Settings > General.
- Expand Visibility, project features, permissions.
- From the Project visibility dropdown list, select Public.
- Select the Users can request access checkbox.
- Take a screenshot of this view. Include as much of the publicly visible settings as possible. Make sure to include your project’s name in the upper-left of the screenshot.
opensource@gitlab.com with details of your use case to request written permission for exceptions.GitLab for Startups
For qualifying startups, the GitLab for Startups program provides GitLab Ultimate, plus 50,000 compute minutes per month for 12 months. For more information—including instructions for applying to the program and renewing program membership—see the GitLab for Startups Program page and the GitLab handbook.


