- Set up Geo for Linux package (Omnibus)
- Configure the tracking database
- Troubleshooting
Set up Geo for two single-node sites (with external PostgreSQL services)
The following guide provides concise instructions on how to deploy GitLab Geo for a two single-node site installation using two Linux package instances and external PostgreSQL databases like RDS, Azure Database, or Google Cloud SQL.
Prerequisites:
- You have at least two independently working GitLab sites.
To create the sites, see the GitLab reference architectures documentation.
- One GitLab site serves as the Geo primary site. You can use different reference architecture sizes for each Geo site. If you already have a working GitLab instance, you can use it as the primary site.
- The second GitLab site serves as the Geo secondary site. Geo supports multiple secondary sites.
- The Geo primary site has at least a GitLab Premium license. You need only one license for all sites.
- Confirm all sites meet the requirements for running Geo.
Set up Geo for Linux package (Omnibus)
Prerequisites:
- You use PostgreSQL 12 or later,
which includes the
pg_basebackuptool.
Configure the primary site
-
SSH into your GitLab primary site and sign in as root:
sudo -i -
Add a unique Geo site name to
/etc/gitlab/gitlab.rb:## ## The unique identifier for the Geo site. See ## https://docs.gitlab.com/ee/administration/geo_sites.html#common-settings ## gitlab_rails['geo_node_name'] = '<site_name_here>' -
To apply the change, reconfigure the primary site:
gitlab-ctl reconfigure -
Define the site as your primary Geo site:
gitlab-ctl set-geo-primary-nodeThis command uses the
external_urldefined in/etc/gitlab/gitlab.rb.
Configure the external database to be replicated
To set up an external database, you can either:
- Set up streaming replication yourself (for example Amazon RDS, or bare metal not managed by the Linux package).
- Manually perform the configuration of your Linux package installations as follows.
Leverage your cloud provider’s tools to replicate the primary database
Given you have a primary site set up on AWS EC2 that uses RDS. You can now just create a read-only replica in a different region and the replication process is managed by AWS. Make sure you’ve set Network ACL (Access Control List), Subnet, and Security Group according to your needs, so the secondary Rails nodes can access the database.
The following instructions detail how to create a read-only replica for common cloud providers:
- Amazon RDS - Creating a Read Replica
- Azure Database for PostgreSQL - Create and manage read replicas in Azure Database for PostgreSQL
- Google Cloud SQL - Creating read replicas
When your read-only replica is set up, you can skip to configure your secondary site.
Configure the secondary site to use the external read-replica
With Linux package installations, the
geo_secondary_role
has three main functions:
- Configure the replica database.
- Configure the tracking database.
- Enable the Geo Log Cursor.
To configure the connection to the external read-replica database:
-
SSH into each Rails, Sidekiq and Geo Log Cursor node on your secondary site and login as root:
sudo -i -
Edit
/etc/gitlab/gitlab.rband add the following## ## Geo Secondary role ## - configure dependent flags automatically to enable Geo ## roles ['geo_secondary_role'] # note this is shared between both databases, # make sure you define the same password in both gitlab_rails['db_password'] = '<your_db_password_here>' gitlab_rails['db_username'] = 'gitlab' gitlab_rails['db_host'] = '<database_read_replica_host>' # Disable the bundled Omnibus PostgreSQL, since we are # using an external PostgreSQL postgresql['enable'] = false -
Save the file and reconfigure GitLab:
gitlab-ctl reconfigure
In case you have connectivity issues to your replica database you can check TCP connectivity from your server with the following command:
gitlab-rake gitlab:tcp_check[<replica FQDN>,5432]
If this step fails, you might be using the wrong IP address, or a firewall might be preventing access to the site. Check the IP address, paying close attention to the difference between public and private addresses. If a firewall is present, ensure the secondary site is allowed to connect to the primary site on port 5432.
Manually replicate secret GitLab values
GitLab stores a number of secret values in /etc/gitlab/gitlab-secrets.json.
This JSON file must be the same across each of the site nodes.
You must manually replicate the secret file across all of your secondary sites, although
issue 3789 proposes to change this behavior.
-
SSH into a Rails node on your primary site, and execute the command below:
sudo cat /etc/gitlab/gitlab-secrets.jsonThis displays the secrets you must replicate, in JSON format.
-
SSH into each node on your secondary Geo site and sign in as root:
sudo -i -
Make a backup of any existing secrets:
mv /etc/gitlab/gitlab-secrets.json /etc/gitlab/gitlab-secrets.json.`date +%F` -
Copy
/etc/gitlab/gitlab-secrets.jsonfrom the primary site Rails node to each secondary site node. You can also copy-and-paste the file contents between nodes:sudo editor /etc/gitlab/gitlab-secrets.json # paste the output of the `cat` command you ran on the primary # save and exit -
Ensure the file permissions are correct:
chown root:root /etc/gitlab/gitlab-secrets.json chmod 0600 /etc/gitlab/gitlab-secrets.json -
To apply the changes, reconfigure every Rails, Sidekiq, and Gitaly secondary site node:
gitlab-ctl reconfigure
gitlab-ctl restart
Manually replicate the primary site SSH host keys
-
SSH into each node on your secondary site and sign in as root:
sudo -i -
Back up any existing SSH host keys:
find /etc/ssh -iname 'ssh_host_*' -exec cp {} {}.backup.`date +%F` \; -
Copy OpenSSH host keys from the primary site.
-
If you can access as root one of the primary site nodes serving SSH traffic (usually, the main GitLab Rails application nodes):
# Run this from the secondary site, change `<primary_site_fqdn>` for the IP or FQDN of the server scp root@<primary_node_fqdn>:/etc/ssh/ssh_host_*_key* /etc/ssh -
If you only have access through a user with
sudoprivileges:# Run this from the node on your primary site: sudo tar --transform 's/.*\///g' -zcvf ~/geo-host-key.tar.gz /etc/ssh/ssh_host_*_key* # Run this on each node on your secondary site: scp <user_with_sudo>@<primary_site_fqdn>:geo-host-key.tar.gz . tar zxvf ~/geo-host-key.tar.gz -C /etc/ssh
-
-
For each secondary site node, ensure the file permissions are correct:
chown root:root /etc/ssh/ssh_host_*_key* chmod 0600 /etc/ssh/ssh_host_*_key -
To verify key fingerprint matches, execute the following command on both the primary and secondary nodes on each site:
for file in /etc/ssh/ssh_host_*_key; do ssh-keygen -lf $file; doneYou should get an output similar to the following:
1024 SHA256:FEZX2jQa2bcsd/fn/uxBzxhKdx4Imc4raXrHwsbtP0M root@serverhostname (DSA)
256 SHA256:uw98R35Uf+fYEQ/UnJD9Br4NXUFPv7JAUln5uHlgSeY root@serverhostname (ECDSA)
256 SHA256:sqOUWcraZQKd89y/QQv/iynPTOGQxcOTIXU/LsoPmnM root@serverhostname (ED25519)
2048 SHA256:qwa+rgir2Oy86QI+PZi/QVR+MSmrdrpsuH7YyKknC+s root@serverhostname (RSA)
The output should be identical on both nodes.
-
Verify you have the correct public keys for the existing private keys:
# This will print the fingerprint for private keys:
for file in /etc/ssh/ssh_host_*_key; do ssh-keygen -lf $file; done

# This will print the fingerprint for public keys:
for file in /etc/ssh/ssh_host_*_key.pub; do ssh-keygen -lf $file; done
The output for the public and private key commands should generate the same fingerprint.
-
For each secondary site node, restart
sshd:# Debian or Ubuntu installations sudo service ssh reload # CentOS installations sudo service sshd reload -
To verify SSH is still functional, from a new terminal, SSH into your GitLab secondary server. If you can’t connect, make sure you have the correct permissions.
Set up fast lookup of authorized SSH keys
After the replication process is complete, you need to configure fast lookup of authorized SSH keys.
Add the secondary site
-
SSH into each Rails and Sidekiq node on your secondary site and sign in as root:
sudo -i -
Edit
/etc/gitlab/gitlab.rband add a unique name for your site.## ## The unique identifier for the Geo site. See ## https://docs.gitlab.com/ee/administration/geo_sites.html#common-settings ## gitlab_rails['geo_node_name'] = '<secondary_site_name_here>'Save the unique name for the next steps.
-
To apply the changes, reconfigure each Rails and Sidekiq node on your secondary site.
gitlab-ctl reconfigure - Go to the primary node GitLab instance:
- On the left sidebar, at the bottom, select Admin Area..
- Select Geo > Sites.
-
Select Add site.
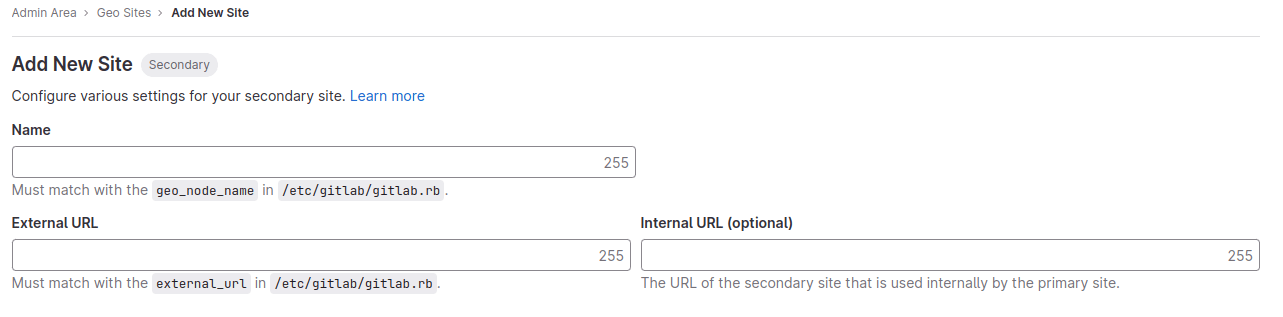
- In Name, enter the value for
gitlab_rails['geo_node_name']in/etc/gitlab/gitlab.rb. The values must match exactly. - In External URL, enter the value for
external_urlin/etc/gitlab/gitlab.rb. It’s okay if one values ends in/and the other doesn’t. Otherwise, the values must match exactly. - Optional. In Internal URL (optional), enter an internal URL for the primary site.
- Optional. Select which groups or storage shards should be replicated by the secondary site. To replicate all, leave the field blank. See selective synchronization.
- Select Save changes.
-
SSH into each Rails and Sidekiq node on your secondary site and restart the services:
sudo gitlab-ctl restart -
Check if there are any common issues with your Geo setup by running:
sudo gitlab-rake gitlab:geo:checkIf any of the checks fail, see the troubleshooting documentation.
-
To verify that the secondary site is reachable, SSH into a Rails or Sidekiq server on your primary site and run:
sudo gitlab-rake gitlab:geo:checkIf any of the checks fail, check the troubleshooting documentation.
After the secondary site is added to the Geo administration page and restarted, the site automatically starts to replicate missing data from the primary site in a process known as backfill.
Meanwhile, the primary site starts to notify each secondary site of any changes, so that the secondary site can act on the notifications immediately.
Be sure the secondary site is running and accessible. You can sign in to the secondary site with the same credentials as were used with the primary site.
Enable Git access over HTTP/HTTPS and SSH
Geo synchronizes repositories over HTTP/HTTPS (enabled by default for new installations), and therefore requires this clone method to be enabled. If you convert an existing site to Geo, you should check that the clone method is enabled.
On the primary site:
- On the left sidebar, at the bottom, select Admin Area.
- Select Settings > General.
- Expand Visibility and access controls.
- If you use Git over SSH:
- Ensure Enabled Git access protocols is set to Both SSH and HTTP(S).
- Enable the fast lookup of authorized SSH keys in the database on both the primary and secondary sites.
- If you don’t use Git over SSH, set Enabled Git access protocols to Only HTTP(S).
Verify proper functioning of the secondary site
You can sign in to the secondary site with the same credentials you used with the primary site.
After you sign in:
- On the left sidebar, at the bottom, select Admin Area.
- Select Geo > Sites.
- Verify that the site is correctly identified as a secondary Geo site, and that Geo is enabled.
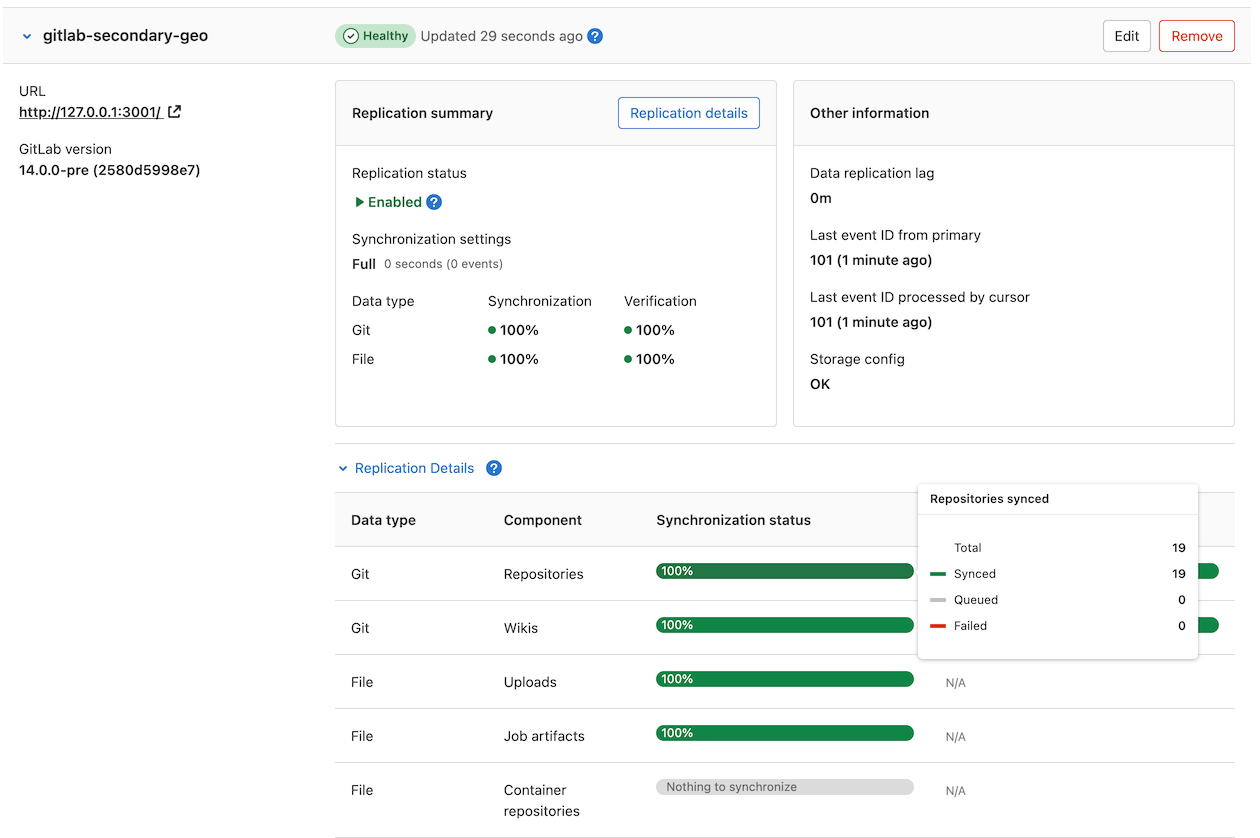
The initial replication might take some time. You can monitor the synchronization process on each Geo site from the primary site Geo Sites dashboard in your browser.
Configure the tracking database
Secondary sites use a separate PostgreSQL installation as a tracking
database to keep track of replication status and automatically recover from
potential replication issues. The Linux package automatically configures a tracking database
when roles ['geo_secondary_role'] is set.
If you want to run this database external to your Linux package installation, use the following instructions.
Cloud-managed database services
If you are using a cloud-managed service for the tracking database, you may need
to grant additional roles to your tracking database user (by default, this is
gitlab_geo):
- Amazon RDS requires the
rds_superuserrole. - Azure Database for PostgreSQL requires the
azure_pg_adminrole. - Google Cloud SQL requires the
cloudsqlsuperuserrole.
Additional roles are needed for the installation of extensions during installation and upgrades. As an alternative, ensure the extensions are installed manually, and read about the problems that may arise during future GitLab upgrades.
Create the tracking database
Create and configure the tracking database in your PostgreSQL instance:
- Set up PostgreSQL according to the database requirements document.
- Set up a
gitlab_geouser with a password of your choice, create thegitlabhq_geo_productiondatabase, and make the user an owner of the database. You can see an example of this setup in the self-compiled installation documentation. -
If you are not using a cloud-managed PostgreSQL database, ensure that your secondary site can communicate with your tracking database by manually changing the
pg_hba.confthat is associated with your tracking database. Remember to restart PostgreSQL afterwards for the changes to take effect:## ## Geo Tracking Database Role ## - pg_hba.conf ## host all all <trusted tracking IP>/32 md5 host all all <trusted secondary IP>/32 md5
Configure GitLab
Configure GitLab to use this database. These steps are for Linux package and Docker deployments.
-
SSH into a GitLab secondary server and login as root:
sudo -i -
Edit
/etc/gitlab/gitlab.rbwith the connection parameters and credentials for the machine with the PostgreSQL instance:geo_secondary['db_username'] = 'gitlab_geo' geo_secondary['db_password'] = '<your_tracking_db_password_here>' geo_secondary['db_host'] = '<tracking_database_host>' geo_secondary['db_port'] = <tracking_database_port> # change to the correct port geo_postgresql['enable'] = false # don't use internal managed instance -
Save the file and reconfigure GitLab:
gitlab-ctl reconfigure
Manually set up the database schema (optional)
The reconfigure in the steps above handles these steps automatically. These steps are provided in case something went wrong.
-
This task creates the database schema. It requires the database user to be a superuser.
sudo gitlab-rake db:create:geo -
Applying Rails database migrations (schema and data updates) is also performed by reconfigure. If
geo_secondary['auto_migrate'] = falseis set, or the schema was created manually, this step is required:sudo gitlab-rake db:migrate:geo
Troubleshooting
See troubleshooting Geo.